Sunday, December 30, 2018

Zojirushi: Butter Mochi


I've had a Zojirushi Home Bakery Mini Breadmaker for almost a decade now.  And I pull it out now and then to make a delicious loaf of bread.  But I've never used the other settings, one of which is CAKE.  Yes, I know, how is this possible?  Well, I guess I was just waiting for the right cake to make.  I'm still not sure what internet black hole I had fallen down when I found this recipe, but butter mochi cake is a dessert beloved by Hawaiians.  And now I know why.  Soft and chewy, but with a great buttery flavor and topped with coconut?  Winner.  I just hope you have a Zojirushi breadmaker to bake it in.

Butter Mochi
From Zojirushi

1 large egg
¾ cup whole milk
2 tablespoons unsalted butter, melted
⅔ cup granulated sugar
¾ cup sweet rice flour (Mochiko)
½ teaspoon baking powder
½ teaspoon pure vanilla extract
½ cup sweetened flaked coconut, divided use

Make sure the kneading blade is properly attached, and add the ingredients to baking pan in the order listed, except for the coconut.

Place the baking pan into the Home Bakery Mini Breadmaker, close the lid, and plug the cord into the outlet. Select the CAKE course and press START. When the add beeps sound, press START again to resume kneading.  When mixing (kneading cycle) completes (three minutes later), open the lid and carefully scrape off any flour that may be left on the side of the pan with a rubber spatula. Sprinkle half of the coconut on top of the batter, close the lid and resume baking.

When 1:00 shows in the display, add the remaining coconut on top of the batter.  When baking completes, allow to cool, remove from the pan and cut into squares to serve.

Thursday, December 27, 2018

Genius Kitchen: Creamed Leeks


My mom had initially bought a threesome of leeks for a sauce she wanted to make, but when that didn't happen, she was at a loss for what to do with them.  I volunteered to take them over and see what I could make.  Potato leek soup?  Nah.  Leek tart?  Nah.  I wanted something that really let the leeks shine, so I decided on this treatment, where just a little cream and stock provide the leeks with a luscious sauce to star in.

Creamed Leeks
Adapted from Genius Kitchen

3 large leeks, white and light green parts only
2 tablespoons unsalted butter
1 cup chicken broth
1 cup heavy cream
½ teaspoon sea salt
¼ teaspoon freshly ground black pepper
Pinch cayenne pepper
¼ teaspoon lemon juice

Slice leeks in half lengthwise and watch thoroughly between layers to remove grit.  Slice leeks crosswise into ¼-inch half-moons.  Sauté leeks in butter over medium-high heat until wilted.  Add chicken broth and simmer until reduced by half.  Add cream, salt, and pepper, and reduce until thick and perfect.  Add cayenne pepper and lemon juice and serve.

Makes 4 servings

Tuesday, December 25, 2018

Good Housekeeping: Peppercorn Beef Tenderloin


For Christmas dinner, my parents managed to procure a beautiful 4½-pound beef tenderloin.  Only problem?  What to do with it.  When you spend $100+ on a piece of meat, you want it to turn out.  Well, not just turn out.  You want it to be the best darn piece of steak you've put in your mouth lately.  Luckily we had a foolproof recipe for cooking the tenderloin perfectly and a killer rub for the outside.  And as you can see from the picture, all was right with the world.

Peppercorn Beef Tenderloin

1 (4- to 5-pound) beef tenderloin, trimmed and tied with butcher's twine, at room temperature
Peppercorn Spice Rub (below)

With paper towels, pat tenderloin dry.  Place on a rack in a roasting pan and rub with Peppercorn Spice Rub.

Preheat oven to 500°F.  Cook tenderloin for 7 minutes per pound, then turn oven off and leave the roast in the oven, with the door closed for the remaining time to one hour total.  (Example: a 4-pound roast will cook at 500°F for 28 minutes, then remain in closed, turned-off oven for an additional 32 minutes.)  Remove from the oven and let rest, covered with foil, for 10 minutes before slicing and serving.  The roast should have medium well sections near the ends, with medium rare towards the middle, for a perfect selection of cuts.

Peppercorn Spice Rub
From Good Housekeeping magazine, November 2018

2 tablespoons pink peppercorns
1 tablespoon green peppercorns
1 tablespoon black peppercorns
3 sprigs fresh rosemary
2 teaspoons honey
1 teaspoon kosher salt

Using a meat mallet or bottom of a heavy pan, coarsely crush the peppercorns; transfer to a small bowl.  Strip leaves from rosemary, finely chop and add to the same bowl along with honey and salt; mix to combine.

Christina's Cucina: Mocha Yule Log


This year when my mom asked what kind of cake we were having for Christmas dinner dessert, I volunteered without really thinking through my decision.  I mean, Christmas dessert is a big deal.  You can't just bring any old cake.  So I decided to just go all out and make a fabulous yule log cake.  Despite appearances, the cake and filling are actually surprisingly light, and the mocha filling is just perfect with the rich chocolate sponge and frosting.  Plus, it rolled perfectly, making for a very relieved baker.  Merry Christmas, all!

Mocha Yule Log
From Christina's Cucina blog and Hershey's

Cake:
6 large egg whites, at room temperature
¾ cup granulated sugar, divided use
6 large egg yolks
 cup unsweetened cocoa powder
1 teaspoon pure vanilla extract
Pinch of salt
Confectioner’s sugar, for rolling cake

Filling:
1½ cups heavy cream
½ cup confectioner’s sugar
¼ cup unsweetened cocoa powder
2 teaspoons instant espresso powder

Frosting:
6 tablespoons unsalted butter, softened
2 teaspoons pure vanilla extract
2⅔ cups confectioner's sugar
4 to 6 tablespoons milk
½ cup unsweetened cocoa powder
Mint sprigs and fresh cranberries, for decorating

Prepare 15x10x1-inch jelly (Swiss) roll pan by buttering the pan, lining with parchment paper, and then lightly buttering the paper. Preheat oven to 375ºF.

In large bowl, beat egg whites at high speed until soft peaks form when beaters are slowly lifted. Add ¼ cup sugar, two tablespoons at a time, beating until stiff peaks form.  Set aside.

Using the same beaters, beat yolks at high speed, adding remaining ½ cup sugar, two tablespoons at a time, until very thick (about 4 minutes.  At low speed, beat in cocoa, vanilla and salt until smooth.  With a spatula, gently fold cocoa mixture into egg whites just until blended (until there are no egg whites visible). Spread evenly into pan.

Bake for 15 minutes, or until surface springs back when gently pressed.  Place a clean linen kitchen towel on workspace and sprinkle with confectioner's sugar. Turn cake out onto sugared towel and carefully peel off paper. Roll up cake, starting with the short end.  Continue rolling until the end, and then place seam side down onto cooling rack. Allow to cool completely.

Place all filling ingredients in a bowl and beat until thick; then chill.

To assemble, unroll the cake and cover with filling to 1" from the edge.  Re-roll without the cloth, and place seam side down onto serving plate.  Cut a piece off the end of the log, at a 45 degree angle.

To prepare frosting, mix together the butter, vanilla, sugar, and 2 tablespoons of milk until smooth. Add cocoa powder and enough milk to make the frosting spreadable.

Spread a little frosting on an end of the piece and attach it to the log to make it look like a log with a cut branch on it.  Frost the entire log, and make the frosting look like wood by making rough streaks with a fork.  Decorate with mint sprigs and cranberries.

Monday, December 24, 2018

Better Homes & Gardens New Cookbook: Porcupine Meatballs


For Christmas Eve, my family typically has a spread of appetizers, so there's little bits of lots of interesting things to eat.  I knew that I wanted to bring some sort of meatball dish, but I didn't want the usual suspects.  Then I happened to see a reference on Pinterest to this recipe from my mom's old cookbook, and I knew I had a winner.  The rice takes the place of the breadcrumbs in the recipe, and the tomato soup forms a delicious sauce for the meatballs.  Just add toothpicks.

Porcupine Meatballs
From the 1974 edition of the Better Homes and Gardens New Cookbook

1 pound ground beef
¼ cup uncooked long-grain rice
1 large egg, slightly beaten
1 tablespoon snipped parsley
2 tablespoons finely chopped onion
½ teaspoon sea salt
⅛ teaspoon freshly ground black pepper
1 (10¾-ounce) can condensed tomato soup, divided use
½ cup water
1 teaspoon Worcestershire sauce

Combine meat, rice, egg, parsley, onion, salt, pepper, and ¼ cup condensed tomato soup.  Mix thoroughly; shape in about 20 small balls and place in skillet.  Mix remaining soup, water, and Worcestershire sauce; pour over meatballs.  Bring to boil; reduce heat; cover and simmer 35 to 40 minutes, stirring often.

Makes 4 to 5 servings

D Magazine: Central Market's Love Dip


Every time I walk through Central Market, I look longingly at this dip.  And I have to remind myself that I need to eat something normal for dinner, and not this dip by the spoonful.  There's just something addictive about this dip, but I wanted to see if I could make it on my own instead of relying on the dip buffet at the store.  Luckily, D Magazine had some hints for me.  This dip is delicious with corn or potato chips.  Or just eaten off a spoon.

Central Market's Love Dip
Adapted from D Magazine

2 (8-ounce) packages cream cheese
1 cup canned whole tomatoes, seeded and chopped
1 tablespoon fresh garlic, minced
1 teaspoon tomato paste
1 teaspoon onion powder
⅛ teaspoon cayenne pepper
¼ teaspoon white pepper
½ teaspoon sea salt
1 teaspoon fresh tarragon, chopped
1 tablespoon fresh cilantro, chopped
1 teaspoon fresh lemon juice

Add cream cheese, chopped tomatoes, garlic, tomato paste, and lemon juice to a food processor and process until smooth and creamy. Remove from processor. Fold in remaining ingredients and mix well.

Makes 6 to 8 servings

King Arthur Flour: Speculaas Spiced Springerle


This year when I was flipping through the King Arthur Flour catalog, I noticed a whole section on springerle molds.  I had seen these pressed cookies before, but since it seemed that the molds had to be handed down from one generation to the next (and I was too lazy to peruse eBay), I figured they were something other people made.  Well, one snowflake mold later, I have my own batch of delicious spiced cookies.  My niece gave her approval by licking one from top to bottom, so I guess they turned out.

Speculaas Spiced Springerle
From King Arthur Flour

1½ cups all-purpose flour
½ cup toasted almond flour, or almond flour
¼ teaspoon baking soda
½ cup (1 stick) unsalted butter, at room temperature
¾ cup granulated sugar
1 teaspoon vanilla extract
3½ teaspoons ground cinnamon
¼ teaspoon ground nutmeg
¼ teaspoon ground cloves
⅛ teaspoon ground ginger
⅛ teaspoon ground white pepper
⅛ teaspoon aniseed powder
⅛ teaspoon ground cardamom
½ teaspoon sea salt
1 large egg

In a small bowl, combine the flours and baking soda. Set aside.

In a large mixing bowl, mix together the butter, sugar, vanilla, spice, and salt. Add the egg and mix until well blended. Stir in the flour mixture.  Form the dough into two disks, wrap in plastic, and refrigerate for 2 hours or more.

Lightly grease (or line with parchment) two baking sheets.  Working with one disk at a time, roll the dough ⅛-inch to ¼-inch thick.  Brush a light coating of flour onto the dough and your springerle mold. Press the mold firmly into the dough, then remove and cut around the design with a knife or pastry wheel.  Transfer the cookies to the prepared baking sheets and freeze for at least 30 minutes; this helps the cookies retain their shape while baking.

Fifteen minutes before baking the cookies, preheat the oven to 300°F.  Bake the cookies for 25 to 30 minutes, until they're light gold around the edges. Remove them from the oven, and cool them right on the pan.

Makes 2 to 4 dozen cookies, depending on size of mold

Sunday, December 23, 2018

Confessions of a Confectionista: Tiramisu Macarons


Ever since I made a vanilla and chocolate version of macarons several years ago, I've been both looking forward to and secretly dreading my next attempt at these cookies.  I love how delicious they are, so delicate and tender.  But that also means they're a giant pain in the butt to get from batter to eating without breaking or otherwise damaging them.  Several hours later, I can attest to the deliciousness that is tiramisu flavored macarons.  Worth. Every. Minute.

Tiramisu Macarons
Adapted from Confessions of a Confectionista blog

120 grams almond flour
200 grams confectioner’s sugar
½ teaspoon instant espresso powder
90 grams egg whites (about 3 large eggs), at room temperature
50 grams granulated sugar
Pinch of salt
¼ teaspoon cream of tartar

For the filling:
½ cup mascarpone cheese
3 tablespoons heavy cream
1 tablespoon Kahlua
2 tablespoons granulated sugar
¼ teaspoon vanilla extract
Finely grated chocolate (optional)

Add almond flour, powdered sugar, and instant espresso powder to the bowl of a food processor. Pulse a few times to combine and break apart any big lumps. Sift almond flour and sugar mixture into a clean bowl. Then, sift again. Discard any large pieces that do not pass through the sieve.

In the bowl of a stand mixer fitted with a whisk attachment, beat egg whites until foamy. Add granulated sugar, salt, and cream of tartar and beat on medium speed for 5 to 10 minutes, or until stiff peaks form. The beaten egg whites should stick to the whisk when you remove it. Tap the whisk against the side of the bowl to release them into the bowl.

Pour the dry ingredients into the bowl with the egg whites. Using a spatula, fold the dry ingredients into the egg whites, until the batter is thick and lava-like. This should take about 70 to 80 folds. Do not overmix. The batter should slowly fall off your spatula when you pick it up and any peaks in the batter should settle down within 20 seconds.

Transfer batter to a piping bag fitted with a small round tip. Line two baking sheets with parchment paper. Pipe 1½-inch rounds onto the parchment paper. It is helpful to use a guide here, so all your macarons are the same size. Once all the rounds are piped out, slam the baking sheet against a flat stable surface, then rotate, and slam again. This is done to force any large air bubbles to the surface. Let the piped macarons dry on the countertop for 45 minutes to 1 hour.

Preheat oven to 290°F. Bake on the middle rack for 12 to 14 minutes. Oven temperature varies, so keep an eye on them. To check if they are done, touch the top of the macaron. If it wobbles, it's not done yet. Let cool completely on baking sheet.

To prepare filling, using an electric hand mixer, beat together mascarpone cheese, heavy cream, Kahlua, sugar, and vanilla until smooth and creamy.  Fold in grated chocolate, if using.

Match macarons up into pairs of similar sizes as best as you can. Pipe whipped cream filling onto the flat side of half of the macarons. Top them with the other half. Refrigerate in an airtight container overnight to let the flavors develop. Dust with cocoa powder before serving.

Makes 3 dozen small macarons

Saturday, December 22, 2018

Food & Wine: Chocolate Amaretti Cookies


I recently went to a pretty awesome Christmas cookie exchange, and there were some yummy meringue cookies out that the hostess told me were amaretti.  I requested the recipe, of course, but I just couldn't wait to try them on my own.  While these don't look quite like the ones at the party, they seem to be a pretty good representation of the traditional version.  And based on how many certain people shoved in their faces, I think they turned out just fine.

Chocolate Amaretti Cookies
From Food and Wine magazine, April 2013

1 (7- or 8-ounce) package pure almond paste, broken up
1 cup granulated sugar
¼ cup plus 2 tablespoons unsweetened cocoa powder
Pinch of salt
3 large egg whites
½ cup mini chocolate chips
Pearl sugar or Italian pignoli, for decorating

Preheat the oven to 375°F and line 2 baking sheets with parchment paper. Arrange racks in the upper and lower thirds of the oven.

In a food processor, combine the almond paste, sugar, cocoa powder and salt and process until the almond paste is very finely chopped. Add the egg whites and process until smooth. Add the chocolate chips and pulse just until incorporated.

Transfer the batter to a pastry bag fitted with a ½-inch plain tip. Pipe half of the batter 2 inches apart on the prepared baking sheets in slightly rounded teaspoons (about 1 inch in diameter). Alternatively, use a spoon to dollop the batter. Generously sprinkle the cookies with pearl sugar or pignoli.

Bake the cookies for 13 to 14 minutes, until risen and lightly cracked but still soft, shifting the pans from top to bottom and front to back halfway through. Slide the paper onto racks and let the cookies cool completely on the paper. Let the baking sheets cool completely, line with fresh parchment paper and repeat with the remaining batter. Invert the parchment onto a work surface and peel it off the cookies.

Makes about 42 cookies

Friday, December 21, 2018

CD Kitchen: Crock Pot Pheasant in Mushroom Sauce


I just happened to be meandering around my local foodie grocery when I noticed something new and interesting in the frozen game section.  It was a pile of frozen pheasants.  I had never actually had pheasant, so of course I had to acquire some and try them out.  I quickly learned that pheasant is so lean, it's basically shoe leather after cooking.  Then I found this recipe, which ensures about as good of an outcome as you can hope for in such a lean bird.  You don't get to admire the beautiful pheasant pieces, but it's delicious and comforting on a cold day.

Crock Pot Pheasant in Mushroom Sauce
Adapted from CD Kitchen

2 pheasants, cut into quarters
1 medium onion, chopped
1 (4-ounce) can sliced mushrooms, drained
½ cup chicken broth
2 tablespoons all-purpose flour
1 tablespoon Worcestershire sauce
1 teaspoon sea salt
2 cloves garlic, finely chopped
2 (10¾-ounce) cans condensed cream of chicken soup, divided use
½ teaspoon dried marjoram
½ teaspoon dried thyme
½ teaspoon dried summer savory (optional)

Place the pheasant pieces in the crock pot. Sprinkle with the onion and mushrooms.

In a bowl, combine the broth and flour until the flour is dissolved. Stir in the Worcestershire sauce, salt, garlic, 1 can of cream of chicken soup, and the dried herbs. Mix well. Pour over the pheasant.  Cover the crock pot and cook on low heat for 6 hours or until the pheasant is cooked.

Remove the pheasant pieces from the crock pot and put the meat from the bones, discarding the bones.  Add remaining can of cream of chicken soup to the crock pot and stir to combine.  This will thicken the gravy for the pheasant.  Return the pheasant meat to the crock pot.

Serve the pheasant with the gravy over noodles or rice.

Makes 4 servings

Monday, December 17, 2018

Alton Brown: Aged Eggnog


I've tried some eggnog recipes in the past, and they were just so over-the-top hit-you-in-the-face with the liquor that I was pretty much decided that eggnog wasn't for me.  Luckily, I decided to give it one more try this year with a recipe from Alton Brown, who has never failed me.  This version of eggnog is more like an adult milkshake than a fraternity party attempt to get as drunk as possible as fast as possible.  And adult milkshake is definitely more my speed.

Note: I used Maker's Mark bourbon, Bacardi dark rum, and V.S.O.P. cognac.  I aged the first batch about a month, the second about 10 days.  Both were amazing.

Aged Eggnog
From Alton Brown

12 large eggs (pasteurized if you need peace of mind)
1 pound granulated sugar
1 pint half-n-half
1 pint whole milk
1 pint heavy cream
1 cup Jamaican rum
1 cup cognac
1 cup bourbon
1 teaspoon freshly grated nutmeg (plus more for serving)
¼ teaspoon kosher salt

Separate the eggs and store the whites for another purpose.

Beat the yolks with the sugar and nutmeg in a large mixing bowl until the mixture lightens in color and falls off the whisk in a solid "ribbon."

Combine dairy, booze, and salt in a second bowl or pitcher and then slowly beat into the egg mixture.
Move to a large glass jar (or a couple of smaller ones) and store in the fridge for a minimum of 2 weeks. A month would be better, and two better still. In fact, there's nothing that says you couldn't age it a year, but I've just never been able to wait that long. (And yes, you can also drink it right away.)

Serve in mugs or cups topped with a little extra nutmeg grated right on top.

Sunday, December 16, 2018

King Arthur Flour: Chocolate Almond Flour Torte


I was randomly flipping through a King Arthur Flour catalog (a.k.a. the adult foodie version of the Sears toy catalog), and I happened to see a recipe for this gorgeous chocolate log of deliciousness.  So, being the rational adult that I am, I immediately ordered the special wavy pan and bittersweet chocolate wafers needed to make the beautiful cake.  And it was everything the catalog promised.  The almond flour makes for a tender, moist cake, and the chocolate flavor is deep, rich, and out of this world.

Note: King Arthur Flour recommends Guittard Bittersweet Onyx Wafers for the bittersweet chocolate, but you can substitute any high-quality 72% bittersweet chocolate.  I used Valrhona cocoa powder, as it has a very rich chocolate flavor.

Chocolate Almond Flour Torte
From King Arthur Flour

Cake:
1 cup almond flour
¼ cup Dutch-process cocoa powder, plus extra for dusting the pan
2 teaspoons espresso powder (optional, for richer chocolate flavor)
¼ teaspoon sea salt
⅔ cup chopped bittersweet chocolate
½ cup (1 stick) unsalted butter, plus extra for greasing the pan
5 large eggs
½ cup granulated sugar
1 teaspoon vanilla extract

Topping:
¼ cup heavy cream
⅓ cup chopped bittersweet chocolate
Toasted sliced almonds, for decoration

To make the cake:

Preheat the oven to 350°F.  Butter a ridged cake loaf pan or an 8-inch round pan and thoroughly dust the inside of the pan with cocoa powder, turning the pan to coat evenly and shaking out any excess. Set the prepared pan aside.

In a small bowl, stir together the almond flour, cocoa powder, espresso powder, and salt. Set aside.

Melt the chocolate and butter on a stove or in short 10 to 20 second increments in the microwave, stirring until smooth. Set aside.

In a large mixing bowl using a paddle attachment, beat the eggs, sugar, and vanilla until the mixture has lightened in color and falls in thick ribbons from the beater, about 5 minutes.  Fold in the melted chocolate followed by the dry ingredients, stirring gently until everything is incorporated.  Pour the batter into the prepared pan. If baking in a ridged cake loaf pan, it's helpful to place the pan on a baking sheet before filling it with batter for easy transfer in and out of the oven.

Bake the cake for 38 to 43 minutes, until a cake tester inserted into the center comes out with just a few moist crumbs clinging to it.  Remove the cake from the oven and set the pan on a rack. Allow the cake to cool in the pan for 5 minutes, then turn it out onto a rack to cool completely.  Once the cake is cool, place the rack over a piece of parchment paper.

To make the topping:

In a saucepan set over medium-high heat or in a small bowl in the microwave, heat the heavy cream until hot. Add the chocolate and let it melt, stirring until the glaze is smooth.

Allow the topping to cool for 5 to 10 minutes then drizzle it down the center of the cake, letting it drip unevenly down the sides onto the parchment paper below.  Top the cake with toasted almonds, if desired, and allow the topping to set until ready to serve.
Refrigerate any leftover torte for up to three days.

Makes 12 to 16 servings

Saturday, December 15, 2018

Parmigiana Bianca di Melanzane (White Eggplant Parmesan)


Probably about a year ago, I was watching something on the Food Network, and they showed an Italian family eating a big feast.  What I remember most was when the old grandmother proudly unveiled her speciality: a beautiful eggplant parmesan made with white eggplants and NO tomato sauce.  I had never heard of such a thing (which is apparently a product of Sicily), but I'm all about unusual dishes.  And I just happened upon some beautiful white eggplants at the store.  If you're more of a cream sauce than a tomato sauce person, I highly recommend this version.

Note: Do not salt the cream sauce unless it absolutely needs it.  The eggplant, prosciutto, and cheeses will be salty enough on their own.

Parmigiana Bianca di Melanzane (White Eggplant Parmesan)

1½ pounds white eggplants
Sea salt
Canola oil, for frying
2 tablespoons unsalted butter, plus additional for greasing dish
3 cloves garlic, minced
1 bay leaf
2 tablespoons all-purpose flour
1½ cups whole milk, heated
Pinch grated nutmeg
¼ teaspoon ground white pepper
½ cup grated Parmesan cheese
½ cup grated Romano cheese
1 (8-ounce) ball mozzarella cheese, cut into slices
6 thin slices prosciutto di Parma
Basil leaves

Cut the top and bottom off of each eggplant, and then cut into ¼-inch slices lengthwise.  Salt liberally and let sit for at least 1 hour.  Rinse the eggplant slices and pat dry with a paper towel.

Heat oil in a large frying pan, then fry eggplant slices until golden brown on both sides and tender.  Set aside on paper towels to drain.

Preheat oven to 350°F.  Butter a 2-quart casserole dish.

Melt the butter in a heavy-bottomed saucepan. Add the garlic and the bay leaf and sauté for 30 seconds.  Stir in the flour and cook, stirring constantly, until the paste cooks and bubbles a bit, but don't let it brown — about 2 minutes. Add the hot milk, continuing to stir as the sauce thickens. Bring the sauce to a boil. Add nutmeg, white pepper, ¼ cup Romano cheese, and ¼ cup Parmesan cheese, lower the heat, and cook, stirring for 2 to 3 minutes more. Remove from the heat.

Spoon a little of the cheese sauce into the bottom of the prepared casserole dish.  Add a layer of eggplant slices, then mozzarella slices, and prosciutto.  Top with some more cheese sauce.  Repeat two more times, ending with cheese sauce (three layers total).  Sprinkle with remaining grated Parmesan and Romano cheeses.

Bake for 30 minutes until casserole is bubbling and the top is golden brown.

Eat What You Love: Paleo Snickerdoodles


What do you do when you're invited to a cookie exchange, and your significant other only eats Paleo?  Well, apparently you cave in and make him a batch of his favorite cookies, Paleo-style.  I'll be honest: I was a little wary of these cookies.  I don't think it's a really cookie unless it has flour and sugar, and these definitely fail that sniff test.  However.  These are actually pretty delicious.  And that's coming from someone who loves herself some sugar.

Note: I used 4 tablespoons (½ stick) unsalted butter instead of the palm shortening.

Paleo Snickerdoodles
From Eat What You Love by Danielle Walker

4½ tablespoons maple sugar
5 teaspoons ground cinnamon
1¼ cups cashew flour
3 tablespoons coconut flour
2 tablespoons arrowroot powder
¾ teaspoon cream of tartar
½ teaspoon baking soda
⅛ teaspoon sea salt
¼ cup pure maple syrup
¼ cup palm shortening
1 teaspoon pure vanilla extract

In a small bowl, combine 1½ tablespoons of the maple sugar and 3 teaspoons of the cinnamon and set aside.

In a food processor, combine the remaining 3 tablespoons maple sugar, the cashew flour, coconut flour, arrowroot, the remaining 2 teaspoons cinnamon, the cream of tartar, baking soda, and salt and pulse 5 times.  Add the maple syrup, palm shortening, and vanilla and process for 15 seconds, until combined.  Transfer the processor bowl to the fridge and chill the dough for 1 hour.

Preheat the oven to 350°F and line two baking sheets with parchment paper.

Using a tablespoon, scoop out the dough and roll it into balls, then roll the balls in the cinnamon sugar to coat.  Place on the prepared baking sheets, spacing them evenly to allow for spreading.

Bake one sheet at a time for 10 to 12 minutes, rotating the sheet halfway through baking, until the cookies are golden brown around the edges.  Cool the cookies on the sheets for 10 minutes, then transfer them to a wire rack to cool completely.

Store the cooled cookies in an airtight container in the refrigerator for 2 weeks, or in the freezer for 6 months.

Makes 24 cookies

Friday, December 14, 2018

Buttery Ranch Party Mix


With party season coming up, I figured I should look into something a little snacky that I can offer any guests.  And let's be honest - it wouldn't hurt to have something delicious at my desk at work while I power through my last week before break.  I've always liked Chex mix, but I wanted to try something a little different.  I kept seeing ranch-flavored mixes on Pinterest, so I decided to go for it.  The herbs and seasonings give this mix a delicious flavor, but it will be difficult to eat just one handful.

Note: I used Snyder's Butter Snaps pretzels and white cheddar Cheez-Its, but absolutely use what you like best.

Buttery Ranch Party Mix

3 cups mini pretzels
2 cups oyster crackers
2 cups Cheez-Its
1 (1-ounce) envelope Hidden Valley ranch seasoning mix
½ teaspoon garlic powder
½ teaspoon onion powder
1 teaspoon dried parsley flakes
½ teaspoon dried dill
⅛ teaspoon cayenne pepper
4 tablespoons (½ stick) unsalted butter, melted

Preheat oven to 300°F.

Add pretzels, oyster crackers, and Cheez-Its to a gallon Ziploc.  Combine ranch seasoning, garlic powder, onion powder, parsley, dill, and cayenne pepper, and sprinkle in the ziploc bag with the pretzel mixture.  Seal and shake to coat.  Open the bag, pour butter over the top, seal bag, and again shake to distribute evenly.  Pour the mixture out onto a half sheet pan and bake for 30 minutes, tossing halfway through to keep pieces from sticking together.

Monday, December 10, 2018

Pioneer Woman: Nantucket Cranberry Pie


I'm ashamed to admit that there were some fresh cranberries left over from the Thanksgiving production.  I got busy with other items, and I just didn't make it to that fresh cranberry sauce.  But that doesn't mean I want those delicious tart cranberries to go to waste.  I had long been eyeing this recipe, as it closely resembles as delicious pie at a local shop, so I had to try it.  And I'm glad I did.  This may be one of the best things I've ever made with fresh cranberries.  I highly recommend it hot with vanilla ice cream.

Nantucket Cranberry Pie
From Pioneer Woman blog

½ cup (1 stick) unsalted butter, melted, plus additional to grease pan
2 heaping cups fresh cranberries
¾ cup pecans, chopped
1⅔ cups granulated sugar, divided use
1 cup all-purpose flour
2 large eggs, lightly beaten
1 teaspoon pure almond extract
¼ teaspoon sea salt
1 tablespoon demerara sugar, for sprinkling

Preheat oven to 350°F.  Generously butter a 9-inch round cake pan.  Add cranberries to the bottom of the greased pan. Sprinkle on chopped pecans, then sprinkle on ⅔ cup of the sugar.

In a mixing bowl, combine flour, remaining 1 cup sugar, melted butter, eggs, almond extract, and salt. Stir gently to combine.  Pour batter slowly over the top in large "ribbons" in order to evenly cover the surface. Spread gently if necessary. Sprinkle with demerara sugar.

Bake for 45 to 50 minutes.  Cut into wedges and serve hot with ice cream or freshly whipped cream.

Makes 10 to 12 servings

Monday, December 03, 2018

Saveur: Piccata di Vitello al Limone (Veal Piccata)


I'm not a huge pasta lover, so whenever I start feeling like something Italian to eat, I look towards more of the meat dish end of the spectrum.  Normally I'm up for whatever chicken cutlet they have on the menu, but sometimes I'm just in the mood for something a little fancier.  And nothing is quite as tender and delicious as veal.  I found some good scaloppini at the grocery store, so I decided to do it up right in a classic veal piccata.  Serve with pasta, if you must.

Piccata di Vitello al Limone (Veal Piccata)
From Saveur: The New Classics Cookbook

Twelve 2- to 3-ounce veal top round cutlets (or chicken breast or turkey cutlets), pounded until ¼-inch thick
Kosher salt and freshly ground black pepper
½ cup all-purpose flour
4 tablespoons (2 ounces) unsalted butter, plus more as needed
2 tablespoons olive oil, plus more as needed
½ cup dry white wine
1¼ cups homemade chicken stock or canned chicken broth
1 lemon, preferably organic, thinly sliced and seeded
1 tablespoon fresh lemon juice
¼ cup capers, drained
2 tablespoons chopped flat-leaf parsley leaves

Season the veal on both sides with the salt and pepper and dredge in the flour, shaking off any excess. Place the cutlets on a plate.

Heat 2 tablespoons butter and the oil in a 12-inch skillet over medium-high heat. Working in batches, add the veal cutlets to the skillet, being careful not to crowd the skillet. Cook, turning once, until golden brown, about 3 minutes total. (If using chicken or turkey, cook until no trace of pink remains, about 3 minutes per side.) Transfer to a serving platter or a baking sheet and loosely cover while you repeat with the remaining veal. If necessary, add more butter and oil to the skillet.

Carefully add the wine to the skillet and cook, still over medium-high heat and scraping the bottom of the skillet, until reduced by half, about 3 minutes. Add the stock and lemon slices and bring to a boil. Cook until reduced by half, about 8 minutes. Add the remaining 2 tablespoons butter, lemon juice, capers, and parsley and season with salt and pepper. Turn off the heat and tilt the pan to swirl the butter until it’s incorporated into the sauce.

Using tongs, place the cutlets back in the skillet, turn to coat them with the sauce, and let them warm through before transferring the cutlets to plates or a platter. Pour the remaining sauce over the cutlets and serve immediately.

Makes 6 servings

Friday, November 23, 2018

Homemade "Stove Top" Stuffing


I love me some Stove Top stuffing.  And no stuffing recipe I have ever made has even come close to the umami chicken goodness of that boxed mix.  But as with most things, I didn't really love how processed it was.  There had to be a better way.  So after scrutinizing the ingredients label of the package and doing some internet research, I came up with this recipe.  And I have to say, it pretty much nails it.  I think this is my go-to stuffing recipe for Thanksgivings to come.

Note: The chicken fat and Accent powder (MSG) will help you achieve the flavor of the packaged stuffing mix, but feel free to substitute additional butter and salt if you can't find these ingredients or prefer not to use them.  I found chicken fat (schmaltz) in the kosher section.  I picked the cubed stuffing mix because it comes the closest in size and texture to the cubes in the box mix, but you can absolutely substitute some fresh dried bread cubes; less stock and some additional poultry seasoning may be needed.

Homemade "Stove Top" Stuffing

3 tablespoons unsalted butter
2 tablespoons chicken fat (schmaltz)
1 cup diced celery
½ cup finely chopped yellow onion
⅓ cup finely chopped carrot
⅓ cup finely chopped flat-leaf parsley
1 teaspoon poultry seasoning
½ teaspoon ground turmeric
½ teaspoon Accent seasoning
½ teaspoon sea salt
¼ teaspoon freshly ground black pepper
2½ cups chicken broth
1 (12-ounce) package Pepperidge Farm Herb Seasoned cubed stuffing

Melt butter and chicken fat in a large skillet over medium-high heat.  Add celery, onion, and carrot, and cook until soft.  Add parsley, poultry seasoning, turmeric, Accent seasoning, salt, and pepper and stir to combine.  Stir in chicken broth and bring to a boil.  Add stuffing mix, stir well to coat all of the bread crumbs, then cover and remove from the heat.  Let set, covered, for 10 minutes.  Fluff with a fork and serve.

Makes 8 to 10 servings

Thursday, November 22, 2018

Broccoli-Cauliflower Casserole


I'm not entirely sure how I have somehow managed to miss posting this recipe over the years.  This is literally one of my favorite things to eat.  It makes an appearance at every Thanksgiving and most Christmas dinners.  It is required consumption.  And my family has been making it since I was a child.  The picture honestly does not do it justice.  I have no clue where the recipe originated, as it is one of those items written on a recipe card (you know what I'm talking about), but God bless whoever came up with this casserole of deliciousness.

Broccoli-Cauliflower Casserole

1 cup (4 ounces) shredded sharp Cheddar cheese
1 (10¾-ounce) can condensed cream of mushroom soup
⅓ cup milk or cream
Dash Tabasco sauce
½ teaspoon garlic powder
Salt and freshly ground black pepper
¼ teaspoon Accent seasoning (optional)
1 (10-ounce) package frozen chopped broccoli, thawed
1 (10-ounce) package frozen cauliflower, thawed and chopped
2 cups corn flakes cereal
2 tablespoons unsalted butter, melted

Preheat the oven to 350°F. Butter a 2-quart casserole dish.

Mix the cheese, soup, milk, and seasonings in a saucepan. Cook over medium heat until the cheese melts completely and the mixture is smooth.

Make layers in the casserole dish – broccoli then sauce, cauliflower then sauce – ending with sauce on top. Crush the cornflakes with a pastry cutter or fork and mix with the melted butter. Sprinkle the cornflakes over the top of the casserole. Bake for 45 minutes, or until the casserole is bubbly and the cornflakes are beginning to brown slightly.

Makes 4 to 6 servings

Wednesday, November 21, 2018

Herb-Roasted Turkey and Pioneer Woman: Turkey Brine


Somehow I got stuck cooking the turkey, even after I tried my hardest to pawn it off on another family member.  How do these things happen?  And then you have the stress of not messing up the turkey.  That's a lot of pressure.  So I figure the best idea would be to brine the thing so it would stay nice and juicy throughout, and I was right.  This turkey was delicious, tender, juicy, and perfectly seasoned.

Note: The brine recipe makes enough for an 18 to 20 pound turkey.  My turkey was only 9 pounds, so I made ¾ of the recipe.  I probably could have gotten away with half, but I wanted to make sure my whole turkey was submerged.  I also recommend starting to check for doneness around the 13 minutes per pound mark, as you don't want to overdo it.  But just in case you do, the brining should help insulate you a bit from dryness.

Herb-Roasted Turkey

1 brined turkey (see below)
2 cups chicken broth
½ cup (1 stick) unsalted butter, softened
2 tablespoons fresh thyme leaves
2 tablespoons chopped fresh rosemary
2 tablespoons choppped fresh sage
1 small onion, cut into quarters
1 large orange, cut into quarters
1 sprig rosemary

Preheat oven to 325°F.

Tie the legs of the turkey together and place on a rack in a roasting pan.  Pour chicken broth in the bottom of the pan.  Gently lift the skin from the breast of the turkey.  Mash the butter with the fresh herbs, then rub ⅓ of the butter under the skin of the breast.  Rub the remaining butter over the outside skin of the breast, thighs, and legs.  Do NOT salt the turkey further; the brine has done its job.  Stuff the cavity with the onion, orange, and rosemary sprig.  Place the turkey in the preheated oven and roast for 13 to 15 minutes per pound, basting every 20 to 30 minutes.  Check for doneness in the thigh, which should be 165°F when done.  Let rest for 20 to 30 minutes before carving.

Turkey Brine
From Pioneer Woman

3 cups apple cider
2 gallons cold water
4 tablespoons fresh rosemary leaves
5 cloves garlic, minced
1½ cups kosher salt
2 cups lightly packed brown sugar
3 tablespoons whole black peppercorns
5 whole bay leaves
Peel of 3 large oranges

Combine all ingredients in a large pot. Stir until salt and brown sugar dissolve. Bring to a boil, then turn off heat and cover.  Allow to cool completely, then pour into a large brining bag or pot. Place uncooked turkey in brine solution, then refrigerate for 16 to 24 hours.

After brining time has elapsed, remove turkey from brine. Submerge turkey in a pot or sink of fresh, cold water. Allow to sit in clean water for 15 minutes to remove excess salt from the outside.  Discard brine. Remove turkey from clean water and pat dry.  If desired, place turkey, uncovered, in the refrigerator overnight to dry out the skin a little.  This will make for a crispier skin after roasting.

Tuesday, November 20, 2018

Instant Pot Pumpkin Cheesecake


Since Thanksgiving is coming, I figured it was time to start cooking.  And since I've got some people in my family that can't handle a ton of carbs, I decided to try something a little less antagonistic.  This recipe is actually a combination of the best of three or four recipes, adjusted to taste by me.  And I've got to say - it turns out an amazing pumpkin cheesecake.  So good that I would actually elect to eat it over other options, even though it technically has no flour or sugar.  In fact, I hesitate to even draw attention to that fact, since some people will automatically decide it must be tasteless.  I promise it's not.  It's fantastic.  And don't be scared of the dates if you've never used them before.  They hold the crust together in beautiful, naturally-sweetened perfection.

Note: Cooking this cheesecake in the Instant Pot yields an incredibly moist and tender cheesecake.  It may not look quite done when you pull it out, but just trust the process, and you'll reap the benefits.

Instant Pot Pumpkin Cheesecake

Crust
1 cup toasted pecans
8 Medjool dates, de-seeded and cut into chunks
¼ cup cassava or coconut flour
2 tablespoons unsalted butter, melted
Pinch of sea salt

Filling
2 (8-ounce) packages cream cheese
1 cup pumpkin puree
½ cup real maple syrup
2 tablespoons half-and-half or heavy cream
1 teaspoon pumpkin pie spice
½ teaspoon ground cinnamon
⅛ teaspoon ground nutmeg
1 teaspoon vanilla extract
2 large eggs

Topping
⅔ cup sour cream
2 tablespoons real maple syrup
½ teaspoon vanilla extract

Preheat oven to 400°F.

Pour pecans into the bowl of a food processor and process until they are coarsely chopped.  Pour them into a bowl, and then reset the food processor.  Put the dates into the food processor and process until they start to form a ball.  Sprinkle with the cassava flour and pour in the butter.  Pulse a few times to combine.  Add the reserved pecans and process until the mixture is well combined and the pecans are finely chopped.  The mixture should stick together when pressed between two fingers.

Gently press the mixture into the bottom and slightly up the sides of an Instant Pot silicone springform pan.  Bake the crust in the preheated oven for 5 to 6 minutes, just until the edges start to brown.  Set aside to cool.

Using a stand mixer on medium-high speed, blend the cream cheese, pumpkin, maple syrup, half-and-half, pumpkin pie spice, cinnamon, nutmeg, and vanilla extract. Blend thoroughly, while scraping the sides of the bowl until completely combined and creamy.  Add the eggs, one at a time, gently mixing on low until just combined without over-beating.

Cover the outer bottom of the springform pan with the crust with a sheet of tin foil to keep water from seeping into the cheesecake. Pour the pumpkin cheesecake filling into the pan over the crust. 

Place a trivet in the bottom of the Instant Pot.  Pour 1½ cups water into the inner pot, then set the cheesecake onto the trivet, making sure the pan is level.  Close and lock the lid on the Instant Pot. Turn the pressure valve handle to Sealing.  Select Pressure Cooker (Manual) on High Pressure. Set the timer for 58 minutes.

While the cheesecake is cooking, in a small bowl, whisk all the topping ingredients until blended, then cover and refrigerate.

Once the cooking time is complete, use the Natural Release method for 25 minutes, and then quick release any remaining pressure.  Remove the lid and lift the cheesecake out of the Instant Pot.  If water has accumulated on top of the cheesecake, gently blot it with a paper towel.  Let the cheesecake cool on the counter for an hour.

While cheesecake is still warm (It’s okay if the center looks less firm and jiggly), spread the sour cream mixture topping over it.  Cover the cheesecake pan with aluminum foil and refrigerate for 12 hours or more until firm.  Carefully and gently release the outer spring ring of the springform pan and serve.

Tuesday, October 30, 2018

Lil Luna: Pumpkin Magic Cake


It's nearly Halloween, and I realized I still haven't made any pumpkin recipes!  How is that possible?  So I quickly ran through everything I have pinned on Pinterest with pumpkin, and I came back across this recipe (thanks, self!).  I'm not quite ready to jump on the Thanksgiving pumpkin pie train, but this layered cake makes a really pretty and delicious dessert option for fall.

Note: I replaced the Cool Whip in the original recipe with real whipped cream.  If you're curious why, research the ingredients in Cool Whip.  Trust me on this.

Pumpkin Magic Cake
Adapted from Lil Luna blog

1 (15.25-ounce) box yellow cake mix PLUS ingredients needed to make - eggs, water, oil
1 (15-ounce) can pumpkin puree
½ cup evaporated milk
½ cup heavy cream
3 large eggs
1 cup lightly packed brown sugar
1 teaspoon pumpkin pie spice

Frosting:
1 cup heavy whipping cream
3 tablespoons powdered sugar
1 (3.4-ounce) box white chocolate instant pudding mix
1 teaspoon pumpkin pie spice
1 cup cold whole milk
White chocolate curls

Preheat oven to 350°F.

Prepare cake as instructed on package and pour into a greased 9x13-inch cake pan. Set aside.

In a medium bowl, combine pumpkin puree, evaporated milk, heavy cream, eggs, and brown sugar and whisk until smooth. Pour all over the cake mix.  Bake for an hour (or until it no longer jiggles in the middle).  Let cool.

Whip heavy cream and powdered sugar until stiff peaks form; set aside.  Make frosting by whisking together the white chocolate pudding mix, pumpkin pie spice, and milk until smooth.  Quickly fold in whipped cream and mix well.  Spread over the cooled cake and top with white chocolate curls.  Refrigerate until ready to serve.

Thursday, October 04, 2018

Saveur: Poulet Demi Deuil (Chicken in Half Mourning)


This is the other recipe I decided on to utilize my precious black truffle.  Because what is better than a juicy roasted chicken, amirite?  I really like the way the shaved truffle peeks out from under the skin of the chicken, which is why it's considered to be in "half mourning".  The truffle infuses into the chicken meat and makes for a very fancy dinner.

Poulet Demi Deuil (Chicken in Half Mourning)
From Saveur magazine, January 2007

1 (3½-pound) chicken, rinsed and dried
¾ ounce black truffles, sliced into thin discs
Salt and freshly ground black pepper
1 clove garlic, peeled and halved lengthwise
2 tablespoons unsalted butter, softened
1 tablespoon rainwater Madeira
1 teaspoon cognac

Working from the neck opening with your fingers, gently pry chicken skin away from as much of the breast and legs as you can without tearing it. Slip truffle slices under skin in a single layer, covering as much flesh as possible. Truss chicken, wrap loosely in plastic, and refrigerate overnight.

Preheat oven to 400°F.

Rub chicken with salt and pepper. Rub large piece of foil with garlic and then butter. Pour Madeira and cognac into chicken cavity and on foil. Place chicken on foil and wrap into a neat, tightly sealed package. Bake on a baking sheet for 1 hour (10 minutes longer for a large chicken). Place package on a serving platter and open at the table to allow everyone to enjoy the fragrant steam. Serve with buttered egg noodles and good crusty bread.

Sunday, September 30, 2018

Chef Dave Martin and D'Artagnan: Black Truffle Mac and Cheese


Once again, I have come across a lovely black truffle in my wanderings at my local grocery, so the race is on to make as many delicious recipes as possible with the gold-plated sucker.  In Googling around, I found this recipe from Top Chef contestant Dave Martin, and I sounded just about perfect.  Note that it is VERY rich, so you only need a small bowl, although I dare you to try and stop there.

Note: To roast garlic, preheat oven to 400°F.  Remove the outer papery layers of the garlic bulb, cut ¼-inch off the top, drizzle with oil, and then wrap in aluminum foil.  Roast for 40 minutes, then begin checking the garlic for doneness.  It is ready when even the center cloves are soft, or you can keep roasting until it is golden brown.

Black Truffle Mac and Cheese
Adapted from Chef Dave Martin and D'Artagnan

1 tablespoon extra-virgin olive oil
½ cup minced shallots
12 cloves roasted garlic
4 cups heavy cream
1½ tablespoons fresh oregano, chopped and cleaned from stems
1½ tablespoons fresh thyme, chopped and cleaned from stems
¼ cup cream sherry
¼ cup brandy
3 tablespoons chopped black truffle
1 cup grated Parmesan cheese, plus additional for topping
¼ cup white truffle-flavored oil
1 teaspoon Tabasco sauce
1 large egg
1½ teaspoons sea salt
1 teaspoon freshly ground black pepper
1½ cups Fontina cheese, finely grated
1 pounds gemelli noodles, cooked in salted water and drained
½ cup Progresso Italian seasoned breadcrumbs

In a stock pot or dutch oven, heat olive oil over a medium flame. Add shallots and cook, stirring occasionally, until they start to caramelize. Add thyme and oregano, stirring to combine. Turn the heat up to medium-high, add roasted garlic and continue to cook, about 2 minutes. Carefully add sherry and brandy, scrape up any browned bits on the bottom of the pan. Return the heat to medium.  Stir in chopped truffle. Slowly stir in the cream, Tabasco sauce, 1 cup Parmesan cheese, and truffle-flavored oil. Continue to cook, until the cream has thickened, about 15 minutes.

Temper the egg: In a small bowl, while whisking, slowly add hot cream mixture, a few teaspoons at a time, to bring the egg up to temperature without cooking it. Whisk tempered egg into the cream mixture. Continue cooking until the mixture coats the back of a spoon and then remove from heat.

Preheat oven to 350°F.

In a large mixing bowl, stir together cooked and drained noodles and Fontina cheese. Add the reduced cream mixture, stirring to completely coat all of the noodles. Pour into a large casserole dish.  Stir the remaining Parmesan cheese into the breadcrumbs. Top each ramekin with the breadcrumb mixture.

Put the ramekins on a lipped sheet pan and bake until lightly golden and heated all the way through.

Saturday, September 29, 2018

Against All Grain: Banana Muffins with Chocolate Chip Streusel Topping


After many happy years stuffing my face with white flour and granulated sugar, I'm slowly being converted to the benefits of maybe cutting those particular ingredients back a tad.  I'm especially interested if I can find a recipe that turns out something nearly as delicious as the original.  These little banana muffins are surprisingly delicious considering there's not a speck of flour or sugar to be seen.  Even if you're not practicing paleo - these would be a good choice for a healthier breakfast.

Note: I used big baking chips instead of minis because that's what I had, but my boyfriend thinks they worked just fine (read: big chocolate flavor).

Banana Muffins with Chocolate Chip Streusel Topping
From Against All Grain blog

4 medium eggs, at room temperature
3 tablespoons honey
1 teaspoon vanilla extract
2 tablespoons coconut oil, softened
½ teaspoon apple cider vinegar
½ cup coconut flour
¼ cup blanched almond flour
½ teaspoon ground cinnamon
1 teaspoon baking soda
½ teaspoon salt
3 overly ripe medium-sized bananas (big brown spots)
¼ cup whole milk
¼ cup mini chocolate chips

Streusel:
¼ cup pecans
1 tablespoon honey
1 teaspoon cinnamon
2 tablespoons mini chocolate chips

Preheat your oven to 350°F.

Using a paddle attachment in a stand mixer, cream together the coconut oil, honey, and vanilla until is light and fluffy.  Add your eggs one at a time, mixing well after each one. Add in the apple cider vinegar.

In a separate bowl, combine the flours, cinnamon, baking soda and salt.  Slowly incorporate the dry ingredients into the wet ingredients, scraping down the sides of the bowl if necessary.  Mash the bananas and the milk in a bowl until it has reached a similar consistency to baby food. Fold the banana mixture into the batter and the chocolate chips if you’re using them.  Spoon the batter into lined muffin tins or reusable silicone muffin cups. Fill to about ¾ full.

For the streusel topping, chop the pecans, honey, and cinnamon in a blender or food processor until finely chopped. Mix in the chocolate chips, then sprinkle the mixture over the muffins.
Bake for 15-20 minutes, until the tops have browned lightly and a toothpick comes out clean.

Makes 12 muffins

Tuesday, September 11, 2018

Southern Fried Corn


There's not much better than fresh summer corn.  And while I love some corn on the cob (preferably slathered in butter), I'm not a huge fan of gnawing on the cob and getting all sorts of bits in my teeth.  So this recipe combines the best of all worlds - delicious sweet corn, no bits in your teeth, and lots of amazing flavor.

Southern Fried Corn

4 ears corn
2 to 3 tablespoons bacon grease or butter
¾ teaspoon sea salt
¾ teaspoon freshly ground black pepper
Fresh chopped parsley or chives, for garnish (optional)

Cut the corn off of the ears and set aside.  Heat the bacon grease over medium-high heat until melted and shimmering.  Add the cut corn, then scrape the milk from the cobs into the frying pan.  Season with the salt and pepper.  Fry the corn until it starts to brown, about 7 or 8 minutes.

Makes 4 servings

Saturday, September 01, 2018

Southern Living: Fresh Coconut Cake


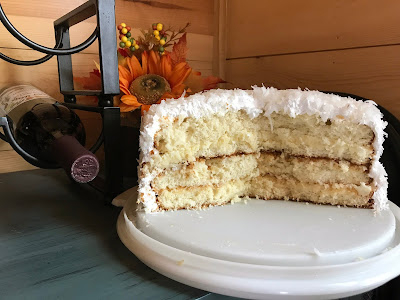
It was recently my father's birthday, and I asked him what cake he wanted.  After much hemming and hawing, I finally got him to admit that he wanted a coconut cake.  Not just any coconut cake, mind you.  THIS coconut cake.  No returns, exchanges, or substitutions.  And what the birthday boy wants, the birthday boy gets.  We normally have this cake at Christmas, since it basically resembles a giant snowball, but it's good all year 'round.

Note: The recipe originally called for a fresh coconut, but my mom has always used a bag of sweetened flaked coconut in substitution.  I think it works just fine since the cake and filling isn't super sweet to begin with, but fresh might be nice.

Fresh Coconut Cake
From Southern Living magazine

1 medium coconut or 1 (14-ounce) bag sweetened flaked coconut
2¼ cups cake flour
1½ cups granulated sugar
¾ cup vegetable shortening
¾ cup whole milk
3 large eggs
2½ teaspoons baking powder
1 teaspoon salt
1 teaspoon pure vanilla extract
Custard Filling
Snow Peak Frosting
Candied orange slices for garnish

Shred the coconut (if using).  Preheat the oven to 375°F. Grease and flour two 9-inch round cake pans.

Into a large bowl, measure the flour, sugar, shortening, milk, eggs, baking powder, salt, and vanilla; with mixer at low speed, beat until well mixed, constantly scraping the bowl with a rubber spatula. Beat at medium speed for 5 minutes. Pour the batter into the prepared pans and bake for 25 to 30 minutes or until a toothpick inserted in the center comes out clean. Cool the pans on racks for 10 minutes and then remove the cakes to the racks and cool completely.

Prepare the custard filling. Stir 1 cup shredded coconut into the chilled custard filling; with a sharp knife, cut each cake horizontally in half. Prepare the Snow Peak Frosting. Place the first layer of cake on a cake plate, cut-side up; spread the cake with about ⅓ of the filling. Repeat the layering, ending with a cake layer top-side up. Frost the sides and top of the cake with Snow Peak Frosting. Sprinkle the sides and top of the cake with about 2 cups of shredded coconut. Refrigerate.

Makes 16 servings

Custard Filling
4 large egg yolks
2 cups whole milk
½ cup granulated sugar
⅓ cup cornstarch
3 tablespoons orange-flavored liqueur (such as Grand Marnier)

In a heavy 2-quart saucepan, with a wire whisk, mix well all of the ingredients until well blended. Over medium heat, cook, stirring constantly, until the mixture thickens, about 10 minutes. Cover the custard’s surface with waxed paper; refrigerate until well chilled, about 1½ hours.

Snow Peak Frosting
1¼ cups light corn syrup
2 large egg whites
Dash salt
1 teaspoon pure vanilla extract

In a 1-quart saucepan over medium heat, heat the corn syrup to boiling; remove the pan from the heat. In a large bowl, with the mixer at high speed, beat the egg whites and salt just until soft peaks form. Slowly pour in the hot syrup; continue beating for 6 to 8 minutes until the frosting is fluffy and forms stiff peaks when the beater is raised. Beat in the vanilla extract.

Saturday, August 04, 2018

Against All Grain: Snickerdoodle Cupcakes


What do you make a man who loves snickerdoodle cookies, but who is also trying to eat a somewhat Paleo diet?  Cupcakes, of course.  I've got to say - every dessert I've had from one of Danielle Walker's books has been inpressively delicious.  Especially considering they have no: all-purpose flour. processed sugar, or dairy.  I honestly didn't think dessert could happen without those items.  Color me impressed.  And these little cupcakes are no exception.  While I'm not sure I could go so far as to call them healthy, they're certainly a far cry from the sugar bombs that I normally make.  Sugar bombs have their time and place, but these will work for the rest.

Snickerdoodle Cupcakes
From Against All Grain by Danielle Walker

4 eggs, at room temperature
½ cup honey
1 tablespoons coconut milk, at room temperature
3 tablespoons melted raw cacao butter
2 teaspoons pure vanilla extract
½ cup coconut flour, sifted
1½ teaspoons cinnamon, plus more for dusting
½ teaspoon baking soda
¼ teaspoon sea salt
Italian Meringue Frosting

Preheat the oven to 350°F.  Line 8 cups of a 12-cup muffin pan with baking cups.

Place the wet ingredients in the bowl of a stand mixer and beat on medium until frothy and fully incorporated.  Add the dry ingredients, beating until combined.  Spoon the batter into the prepared cups of the muffin pan, filling each cup 2/3 full.

Bake for 18 minutes.  Cool completely on a wire rack before frosting.  Pipe or spread frosting on cupcakes, then dust with cinnamon.

Makes 8 cupcakes

Italian Meringue Frosting
2 egg whites
⅓ cup honey
¼ teaspoon lemon juice
Small pinch sea salt

Place the honey in a saucepan over medium-high heat and bring to a boil.

Meanwhile, place the egg whites in the bowl of a stand mixer and beat on high until soft peaks form.  Add the lemon juice and salt and beat to combine.  With the mixer on medium, pour the boiling honey into the bowl in a slow, steady stream.  Continue beating for 6 to 8 minutes, or until stiff peaks form and the meringue is cool to the touch and has doubled in volume.

Makes 3 cups

Saturday, July 28, 2018

Bourbon Maple Bacon Baked Beans


My niece and nephew love baked beans.  LOVE THEM.  I'm not sure why or how this happened, but if you find something a kid will eat, you give it to them.  However, I'm all about making things from scratch, as those canned goods are full of all sorts of stabilizers, thickeners, and other unidentifiables.  So I needed to develop a recipe.  A recipe that wasn't just as bad as the cans because it included ketchup or barbecue sauce.  I know the recipe list looks long, but I promise a big chunk of it is just spices to give the beans their yummy flavor.  The little muchkins gobbled this up and asked for more, so I think that's about the highest praise a recipe can get.

Note: There's a little bourbon in these for the flavor.  It's completely safe for children, as the alcohol cooks out during the long period in the oven, but you can absolutely leave it out anyway.

Bourbon Maple Bacon Baked Beans

8 slices applewood smoked bacon, chopped
1 large yellow onion, chopped
2 (8-ounce) cans tomato sauce
2 tablespoons tomato paste
¼ cup honey
½ cup real maple syrup
3 teaspoons liquid smoke
3 tablespoons Worcestershire sauce
⅓ cup apple cider vinegar
1 tablespoon lemon juice
1 tablespoon unsalted butter
1 teaspoon onion powder
1 teaspoon garlic powder
1 teaspoon paprika
½ teaspoon ground yellow mustard
2 teaspoons sea salt
¼ teaspoon ground white pepper
Pinch ground cinnamon
Pinch ground cloves
¼ cup bourbon (optional)
3 (15-ounce) cans navy beans, rinsed and drained

In a Dutch oven, cook bacon over medium-high heat until crispy and fat is rendered.  Using a slotted spoon, scoop bacon onto a paper towel to drain.  Keep two tablespoons of bacon fat in the pot and discard the rest.  Add the onions to the bacon fat and cook until the onion is translucent.

Add all of the remaining ingredients and stir well to combine.  Add half of the cooked bacon and stir to combine.  Bring to a simmer and cook until slightly reduced, about 20 minutes.

Preheat oven to 350°F.  Pour beans into a casserole dish and top with the remaining bacon.  Cook, covered, for another 30 to 45 minutes, or until beans are slightly saucy and bubbling.

Makes 8 servings

Sunday, July 15, 2018

Spend with Pennies: Spaghetti Casserole


Sometimes the best way to take care of someone is to make them dinner and take it over to their house.  And the best dinner to deliver is probably a casserole.  It's one dish, easy to heat up, and easy to clean up afterwards.  Low effort, high return.  And when it's a pile of tomatoey pasta with sausage and cheese?  Yeah, I don't have to keep convincing you.  This casserole is spaghetti taken to the next level.

Note: I used vermicelli for this casserole instead of traditional spaghetti noodles.  I find that it makes it less doughy with the thinner noodles.

Spaghetti Casserole
Adapted from Spend with Pennies blog

16 ounces dried spaghetti noodles
1 large yellow onion, chopped
4 to 6 cloves garlic, minced
1 pound sweet Italian sausage, casing removed
½ pound hot Italian sausage, casing removed
3 teaspoons dried Italian seasoning, divided use
2 (24-ounce) jars spaghetti sauce, divided use
1 (8-ounce) container ricotta cheese
1 (8-ounce) package cream cheese, at room temperature
¼ cup sour cream
3 cups shredded mozzarella, divided use
½ cup butter, cut into slices, divided use

Preheat oven to 350°F.

Bring a large pot of salted water to a boil. Cook pasta according to package, drain well and return pasta to original pot. Add 1 jar of prepared spaghetti sauce and combine. Set aside.

In a large skillet, heat 2 tablespoons of olive oil over medium heat. Add onion and cook until it begins to soften, about 5 minutes. Add garlic, sausage, and 2 teaspoons Italian seasoning to skillet, and cook until no pink remains. Drain well. Add 1 jar of spaghetti sauce to skillet. Set aside.

In a medium mixing bowl, combine ricotta cheese, cream cheese, sour cream, 1 cup mozzarella, and 1 teaspoon Italian seasoning. Set aside.

Place half the slices of butter in a 9x13 baking dish. Spread half the spaghetti in dish, then spread cheese mixture evenly over spaghetti. Spread remaining spaghetti over cheese mixture. Top with the remaining butter slices. Pour tomato meat sauce evenly over top layer of spaghetti.

Top with remaining mozzarella and bake in preheated oven until casserole is heated through, about 35 to 45 minutes.

Makes 6 servings

Wednesday, July 04, 2018

Honey and Birch: Bacon-Wrapped Dates with a Honey Balsamic Reduction


It's hard to cook for a family full of picky eaters, whether self-imposed or illness-imposed.  Each new item added to the no-no list means that many more recipes that either have to be altered or removed from the rotation entirely.  So it's nice to find creative new recipes that are an easy hit.  I hadn't eaten many dates before, but I figured that anything stuffed with cheese and wrapped in bacon was going to be delicious.  And I wasn't wrong.  Go easy on the balsamic reduction; it's a strong pop of flavor.

Note: I added a dash of cayenne pepper to the goat cheese.  Everyone needs a little spice in their life.

Bacon-Wrapped Dates with a Honey Balsamic Reduction
Adapted from Honey and Birch blog

30 pitted Medjool dates
15 slices of bacon, cut in half
1 (4-ounce) log goat cheese
¼ cup chopped pecans
¼ cup honey
¼ cup balsamic vinegar

Preheat your oven to 350°F and cover a baking sheet with foil. Combine the goat cheese and pecans in a small bowl. Mix well.

Stuff each date with the goat cheese mixture - you want to stuff them so they are full but not overflowing. Wrap a piece of bacon around the date so that the date's opening is covered - stretch the bacon if you need to.  Secure each piece of bacon with a toothpick.

Place each bacon-wrapped date on the baking sheet, spacing evenly on your baking sheet.  Bake for 20 to 25 minutes, until the bacon is crispy, and remove from the oven. Let cool completely before serving.

While the dates are baking, combine the honey and balsamic vinegar in a small saucepan. Cook on medium heat for 10 to 15 minutes, or until combination is reduced by half, stirring occasionally. Remove from heat and let sit to thicken.

Makes 10 servings

Monday, July 02, 2018

Yellow Squash and Zucchini Casserole


My mom decided that it would be a good idea to plant both yellow squash and zucchini in her garden.  She apparently hadn't heard the horror stories from other backyard gardeners.  Don't worry, she now knows that all the stories are true.  Her zucchini plant produced a massive green zucchini, and her squash plants grew enough to fill a Ziploc.  This was all about a week before she left town on vacation.  So all the squashes came to my apartment.  And they merrily ended up in this cheesy concoction.  My favorite part is the herbed cracker topping, so don't leave that part out.

Yellow Squash and Zucchini Casserole

1 pound yellow squash, sliced
1 pound zucchini, sliced
3 tablespoons unsalted butter, divided use
1 large shallot, chopped
1 tablespoon minced garlic
1 sleeve Ritz crackers
½ teaspoon sea salt
¼ teaspoon freshly ground black pepper
1 cup shredded sharp Cheddar cheese
2 large eggs, lightly beaten
¼ teaspoon dried parsley
¼ teaspoon dried marjoram
¼ teaspoon dried thyme
 teaspoon dried dill

Preheat the oven to 350°F. Butter a 2-quart casserole dish.

Boil the squash and zucchini until almost tender. Drain the squash and zucchini well and let cool to room temperature in a colander. Mash against the side of the colander to push out the excess water. Move the squash and zucchini to a large bowl.

In a small saucepan, melt 1 tablespoon of butter. Add the shallot and sauté until translucent, then add the garlic and sauté for another 30 seconds or so.  Do not let the garlic brown.  Add the shallot mixture to the squash in the bowl. Crush 8 to 10 crackers and sprinkle over the squash mixture; mix well. Season with salt and pepper.  Mix in the shredded cheese and the eggs. Pour the mixture into the prepared casserole dish.

Crush the remaining crackers.  Melt the remaining 2 tablespoons of butter with the herbs, and then toss the crackers in the melted butter.  Top the squash with the buttered crackers. Bake, uncovered, for about 30 minutes, or until the casserole is hot and puffed.

Makes 6 servings

Monday, June 25, 2018

Spend with Pennies: Chicken Rice Casserole


Some days you want a super fancy dinner, and some days you just want the food to march into the oven by itself.  I'm having one of the latter type of days.  I remembered this casserole from way back in high school.  I had a date at my boyfriend's house, and his mom made us this super simple, but super comforting chicken and rice casserole.  It was awesome.  Even more awesome is that this version doesn't use instant rice.  Because come on, guys, that stuff is nasty.  Use real food.  Even when you're tired.

Chicken Rice Casserole
From Spend with Pennies blog

4 boneless skinless chicken breasts
1 teaspoon paprika
Sea salt and freshly ground black pepper
1 cup long grain white rice, uncooked
1 envelope Lipton onion soup mix
1 (10½-ounce) can cream of mushroom soup
1½ cups water

Preheat oven to 325°F.

Spray a 9x13-inch baking dish with cooking spray. Add chicken breasts, sprinkle with paprika, and season with salt and pepper.  Sprinkle uncooked rice over chicken, then sprinkle with onion soup mix.  Combine mushroom soup and water and pour over chicken.  Cover with foil and bake 1 hour and 15 minutes, or until rice is tender.

Makes 4 servings