Monday, July 18, 2022

The Dizzy Cook: Creamy Boursin Pasta


I think that Boursin cheese may be the best and easiest way to be ready for guests with an appetizer that I've ever seen, but I figured there had to be more that could be done with the package.  I mean, this is herbed cheese.  Cheese is amazing in almost anything.  And sure enough, I found someone who had used their Boursin to make a kind of fettuccine alfredo that is super easy and fantastically good.

Note: Let's be honest, I didn't just dump in ⅘ of the package, as directed.  I dumped the whole 5 ounces in.  It's still delicious.  Go wild.

Creamy Boursin Pasta
From The Dizzy Cook blog

8 ounces fettuccine pasta
2 tablespoons unsalted butter
2 cloves garlic, minced
¾ cup heavy cream
4 ounces Boursin Garlic & Fine Herbs Cheese
Kosher salt and fresh pepper to taste
Fresh Italian parsley for garnish

Cook pasta according to package directions and drain. Keep about a cup of pasta water just in case you need to thin out the sauce later. Meanwhile melt butter in a large saucepan and cook the garlic for a minute or two until fragrant, but not brown. Add heavy cream and bring the sauce to a simmer, about 5 to 7 minutes, until nice and thick. The spoon should leave a line/trail as you run it through the sauce.

Turn the heat to low and add Boursin cheese, stirring until melted and fully incorporated. Taste the sauce and add any kosher salt or fresh black pepper as needed. Add drained pasta and toss everything to combine. Top with parsley for garnish.

Makes 4 servings

Sunday, July 17, 2022

The Blue Chair Jam Cookbook: Blackberry Jam with Lemon Balm


I've found a local farm that allows you to come and pick fresh blackberries straight off the bushes, and I must, I couldn't resist.  Nothing is better than a fresh ripe berry.  But when you pick a giant basket of berries bursting with juice and ready to be eaten, there's no way that you can make it through the whole bunch before they go bad.  So the only thing to do is cook them up into a delicious jam that you can enjoy throughout the year.

Blackberry Jam with Lemon Balm
From The Blue Chair Jam Cookbook

2 to 3 (10-inch) sprigs lemon balm or lemon basil
3½ pounds midsummer blackberries
1¾ pounds granulated sugar
3 ounces strained freshly squeezed lemon juice

Place a saucer with five metal teaspoons in a flat place in your freezer for testing the jam later. Rinse the herb sprigs under cold running water and pat them dry between two clean kitchen towels.

Combine the berries, sugar, and lemon juice in an 11- or 12-quart copper preserving pan or a wide stainless steel kettle. Heat slowly, stirring with a large heatproof spatula, until the sugar is dissolving and the berries begin releasing a lot of juice. Turn the heat up to high and cook, stirring frequently. Test the jam for doneness 15 to 20 minutes from the time it reaches a rolling boil.

To test for doneness, carefully transfer a small representative half-spoonful of jam to one of your frozen spoons. Replace the spoon in the freezer for 3 to 4 minutes, then remove and carefully feel the underside of the spoon. It should be neither warm nor cold; if still warm, return it to the freezer for a moment. Tilt the spoon vertically to see whether the jam runs; if it just refuses to run, and if it has thickened to a near-jelly consistency, it is done. If it runs, cook it for another few minutes, stirring, and test again as needed.

Using a stainless steel spoon, skim any remaining foam from the surface of the jam. Place the herb springs into the jam, stir, and let steep for a couple of minutes off the heat. Carefully taste the jam and either remove the sprigs or leave them in for another minute or two, keeping in mind that their flavor will be milder once the jam has cooled. Using tongs, discard the sprigs. Pour the jam into sterilized jars and process according to the manufacturer's instructions.

Makes 5 8-ounce jars

Sunday, June 19, 2022

Together as Family: Honey Butter Skillet Corn


When I start to see all the delicious corn hitting the grocery stores, I can never stop myself from buying some.  I've tried growing it (and that was a no-go), so I really appreciate anyone who is able to get these sweet ears to my kitchen in such perfect shape.  The best I can do with it at that point is make something delicious.  This dish is somewhat of a cross between creamed corn and fried corn, with a sweeter profile, but honestly, it all sounds delicious to me.

Note: The original recipe called for frozen corn, but why would you eat that when the fresh summer corn is hitting the stores??

Honey Butter Skillet Corn
Adapted from Together as Family blog

2 tablespoons salted butter
1 pound fresh corn kernels (from approximately 4 large ears)
¼ teaspoon garlic powder
½ teaspoon onion powder
½ teaspoon kosher salt
¼ teaspoon ground white pepper
2 tablespoons honey
2 ounces cream cheese, cut into chunks
2 tablespoons half and half

In a skillet pan, over medium-high heat, melt the butter. Add the corn kernels and all seasonings, and cook for 10 to 15 minutes, stirring occasionally, until cooked through.  Add honey, cream cheese, and half and half. Stir together and let it cook, about 3 to 5 minutes more, while stirring occasionally.  Season to taste with salt.

Makes 6 servings

Friday, June 10, 2022

The Neelys: Lobster Salad Roll


Every time I walk by the seafood counter, I look longingly at the bowl of cooked lobster meat.  Longingly.  But, I knew it was not to be, at least for quite a while.  I finally gave in to my desires, though, and bought myself a half of a pound.  Even that amount nearly gave me heart palpitations, but I persevered, pointedly looking away from the price tag.  Then I came home and made this super awesome lobster salad roll with it, and the lobster sang beautiful songs on my tongue.  If you need a treat, this is it.

Note: The Neelys originally made this into a sort of seafood cocktail in a martini glass, and you can definitely do that, too, but I wanted a butter-toasted sammich.

Lobster Salad Roll
Adapted from The Neelys, as seen at Food Network

⅓ cup mayonnaise
1 teaspoon lemon zest
Juice of 1 lemon
Kosher salt and freshly ground black pepper
¼ teaspoon Old Bay seasoning
1 stalk finely chopped celery
1 finely chopped shallot
1 tablespoon finely chopped fresh tarragon leaves
1 tablespoon finely chopped fresh chives
1 pound lobster meat, very coarsely chopped
4 butter lettuce leaves
4 top-split hotdog buns
Salted butter, for toasting buns

Combine mayonnaise, lemon zest, lemon juice, salt and pepper, celery, shallot, tarragon and chives in a bowl.  Add lobster meat to mayonnaise sauce and combine.

Toast hotdog buns on the exposed sides in butter until golden brown.  Let rest briefly until slightly cooled, then place one butter lettuce leaf in each bun.  Top each lettuce leaf with ¼ of the lobster mixture.

Makes 4 servings

Saturday, June 04, 2022

Corinne Domingo: Spam Musubi


There's a neighborhood poki bowl place that also has spam musubi for sale, and I must admit to being the one who sometimes buys out their remaining selection for the day.  These make great snacks or breakfast or anytime treats.  Frying the spam and then coating them with the sauce gives a fantastic flavor, and the rice provides the perfect vehicle.

Spam Musubi
Adapted from Corinne Domingo, as seen on Food Network

5 cups cooked sushi rice, at room temperature
5 sheets nori, cut in half lengthwise
1 (12-ounce) can Spam
6 tablespoons soy sauce
4 tablespoons mirin
4 tablespoons granulated sugar
1 tablespoon minced garlic
Furikake, to taste

Cut Spam into 10 slices. Fry until slightly crispy. Remove and drain on plate lined with paper towels. In another pan, combine soy sauce, mirin, sugar, and garlic. Bring to a boil over medium-high heat, then reduce to low. Add Spam slices, coating them in the mixture. When mixture has thickened, remove Spam from pan.

Lay a sheet of nori lengthwise on a clean surface. Moisten lower half of musubi maker (see Note), and place on lower third of nori. Fill musubi maker with rice and press flat until the rice is 3/4-inch high. Sprinkle rice with furikake. Top with slice of Spam. Remove musubi maker and keep in a bowl of warm water to keep it clean and moist.

Starting at the end towards you, fold nori over Spam and rice stack, and keep rolling until completely wrapped in the nori. Slightly dampen the end of the nori to seal it. Repeat with the other nine Spam slices, making sure to rinse off musubi maker after each use to prevent it from getting too sticky.

Note: You can also use an empty Spam can that has been opened on both sides for the musubi mold, using your hands (or a piece of Spam) to press down on the rice.

Makes 10 musubi

Sunday, May 22, 2022

Blue Chair Jam Cookbook: Grown-Up Strawberry Jam


Whenever we start getting into fresh produce season, I start getting itchy to make jams with all of the goodness.  I just can't bear to see all those luscious berries go to waste.  It's a way to capture them at their absolute peak and enjoy them the rest of the year.  This jam is a little thinner than I'm used to, but that just makes it perfect for dessert sauces.  The Drambuie gives it a little extra flavor kick.

Note: Add 2 to 3 tablespoons of powdered pectin to make the jam thicker.

Grown-Up Strawberry Jam
From Blue Chair Jam Cookbook

3 pounds 14 ounces hulled strawberries
2½ pounds granulated sugar
6 ounces strained freshly squeezed lemon juice, divided use
2½ ounces Drambuie

Place a saucer with five metal teaspoons in a flat place in your freezer for testing the jam later.

In an 11- or 12-quart copper preserving pan or a wide nonreactive kettle, combine the berries with the sugar and 4 ounces of the lemon juice.  Place the pan over medium-low heat and cook, stirring constantly with a heatproof rubber spatula.  After a few minutes, as the juice starts to run and the mixture begins foaming a little around the edges, gradually raise the heat to high, stirring often.

Boil the mixture vigorously for 20 to 30 minutes, gently scraping the bottom of the pan every few minutes with your spatula to be sure the jam is not sticking.  If it begins to stick, decrease the heat slightly, being sure the jam continues to cook at a rapid boil.  Continue to cook, stirring and scraping the bottom frequently, until the foam subsides, the mixture acquires a darker, shinier look, and the berries appear softened and saturated with liquid, 20 to 25 minutes total.

Remove from the heat.  Do not stir.  Let the mixture rest for a moment, then use a metal soup spoon to carefully skim all the white foam from the top of the mixture.  When you have removed every last bit of white, stir in the remaining 2 ounces of lemon juice and the Drambuie.  Return the jam to medium or medium-low heat and continue to cook, stirring frequently.  If necessary, gradually lower the heat to prevent scorching.

After 3 to 5 more minutes, your jam should again look glossy and dark.  At this point, remove from the heat and test for doneness.  Do not stir.  To test for doneness, carefully transfer a small representative half-spoonful of jam to one of your frozen spoons.  Replace the spoon in the freezer for 3 to 4 minutes, then remove and carefully feel the underside of the spoon.  It should be neither warm nor cold; if still warm, return it to the freezer for a moment.  Tilt the spoon vertically to see how quickly the jam runs; if it runs slowly, and if it has thickened to a gloppy consistency, it is done.  If it runs very quickly or appears watery, cook it for another couple of minutes, stirring, and test again as needed.  This jam, while spreadable, has a relatively loose texture.

When the jam is ready, skim all the remaining foam from its surface, then stir well to be sure the berries and liquid are evenly distributed.  Pour the jam into sterilized jars and process according to the manufacturer's instructions.

Makes 5 to 6 8-ounce jars

Tuesday, May 10, 2022

Alton Brown: Spinach Salad with Warm Bacon Dressing


I haven't had a good spinach salad in quite a while, so I thought it was time to make one my dinner.  This is a recipe I've had hanging around for quite a while, but when it's good, it's a keeper.  Never got around to photographing it until now.  It's really not hard to bring together, and it honestly can make a whole meal.

Spinach Salad with Warm Bacon Dressing
From Alton Brown

8 ounces fresh baby spinach
2 large hard-boiled eggs, each sliced into 8 pieces
8 pieces thick-sliced bacon, chopped
3 tablespoons red wine vinegar
1 teaspoon granulated sugar
½ teaspoon Dijon mustard
Kosher salt and freshly ground black pepper
4 large white mushrooms, sliced
3 ounces red onion, very thinly sliced

Remove the stems from the spinach and wash, drain, and pat dry thoroughly. Place into a large mixing bowl and set aside.

Fry the bacon and remove to a paper towel to drain, reserving 3 tablespoons of the rendered fat. Crumble the bacon and set aside.

Transfer the fat to a small saucepan set over low heat and whisk in the red wine vinegar, sugar, and Dijon mustard. Season with a small pinch each of kosher salt and black pepper.

Add the mushrooms and the sliced onion to the spinach and toss. Add the dressing and bacon and toss to combine. Divide the spinach between 4 plates or bowls and evenly divide the egg among them. Season with pepper, as desired. Serve immediately.

Makes 4 servings

Thursday, May 05, 2022

The Urban Cowgirl: Cheese Enchiladas with Chili Gravy


I feel a little embarrassed that I came to cheese enchiladas so late in my life in Texas.  I always kinda looked down on them, like they were the "lesser" enchiladas behind their chicken and beef siblings.  Boy, was I missing out.  I have come to appreciate the beauty of a corn tortilla filled with melted Cheddar and topped with a chili gravy.  It is true perfection.  Unfortunately, it's been a bit of a task finding a recipe that replicates that restaurant flavor of the chili gravy.  Not sure this one is quite there, but it's the closest I've ever come, so I'm claiming it.

Note: I substituted some of the salt for Adobo seasoning without pepper.

Cheese Enchiladas with Chili Gravy
Adapted from The Urban Cowgirl blog

Sauce
1 pound 80/20 ground beef, chili grind if available
1 tablespoon kosher salt
½ teaspoon black pepper
⅓ cup minced white onion
2 tablespoons Texas chili powder, such as Gebhardts
1 teaspoon garlic powder
1 teaspoon onion powder
½ teaspoon Mexican oregano
2 teaspoons ground cumin
¼ cup all-purpose flour
½ teaspoon kosher salt
2½ cup beef or chicken stock
1 teaspoon fresh lime juice

Enchiladas
12 ounces medium cheddar from the block, freshly grated
½ cup minced white onion
12 fresh yellow or white corn tortillas
1 cup oil for frying

To make the chili gravy:
In a skillet on medium heat, begin searing the ground beef and breaking it up well with a wooden spatula. Sprinkle in the salt (start with half and add more if needed) and pepper and let the meat sear well as you break it up. The dark brown parts of the sear will dissolve and enrich the chili gravy later adding to the flavor.

When the meat is well-seared, add in the onion and cook for 2 minutes, tossing frequently.

Add in the chili powder, garlic powder, onion powder, Mexican oregano, and cumin and let the spices brown and toast in the pan along with the beef.

Finally, turn the heat down to medium and sprinkle in the flour. Toss the flour in the meat and incorporate into the fat and juices creating a roux of sorts. When the flour dissolves into the mixture, pour in the beef stock and whisk it into the mixture.

Turn the heat up to medium-high heat and stir frequently bringing the mixture up to a boil. Allow the mixture to thicken, then lower the heat and simmer for 15 to 20 minutes (or longer if desired). The longer the chili cooks, the more the flavors in the chili gravy will enhance and deepen.

Finish the gravy with ½ teaspoon more salt, if needed, and the fresh lime juice for acidity.

To make the enchiladas:
Preheat the oven to 400°F.

Grease a 9x13-inch casserole dish with a little bit of olive oil or pan spray so the enchiladas will not stick.

Add 2 tablespoons oil to the bottom of a nonstick skillet and heat over low heat. Add a corn tortilla into the pan and fry for about 1 to 2 seconds on each side, then transfer to a paper towel-lined plate for holding. Continue with the remaining corn tortillas until all of the tortillas are soft, oiled, and warm.

Lay out one corn tortilla and in the center of the tortilla add 2 tablespoons or so of freshly grated cheddar cheese and a sprinkling of minced onion. Roll them up and place them in the baking dish with the seam side down. Fill the entire baking dish with enchiladas tucked closely together. Ladle the hot chili gravy sauce on top of the enchiladas.

Place in the oven and bake for 20 minutes or until hot and bubbly. Sprinkle extra cheese and white onion on top if desired.

Makes 6 servings

Friday, April 29, 2022

Tastes of Lizzy T: Frito Salad


Confession time.  I remember eating this salad when I was in elementary school at the cafeteria.  I remembered most of the ingredients, and I definitely remember it being orange.  And I remember loving it.  Haven't had it in a very VERY long time.  I figured it had been quite long enough.  This actually makes a pretty fantastic meatless meal, or you can add some browned ground beef, maybe seasoned with taco seasoning?  I definitely missed this thing.

Frito Salad
Adapted from Tastes of Lizzy T blog

1 head iceberg lettuce, chopped into bite-size pieces
2 large hothouse tomatoes, cut into bite-size pieces
4 green onions, sliced
1 (15-ounce) can ranch style beans, drained
12 ounces finely shredded sharp Cheddar cheese
1 cup Kraft Creamy French dressing
4 cups Fritos

Combine all ingredients except Fritos in a large salad bowl.  Just before serving, mix in the Fritos.

Makes 8 side servings or 4 dinner size portions

Sunday, April 10, 2022

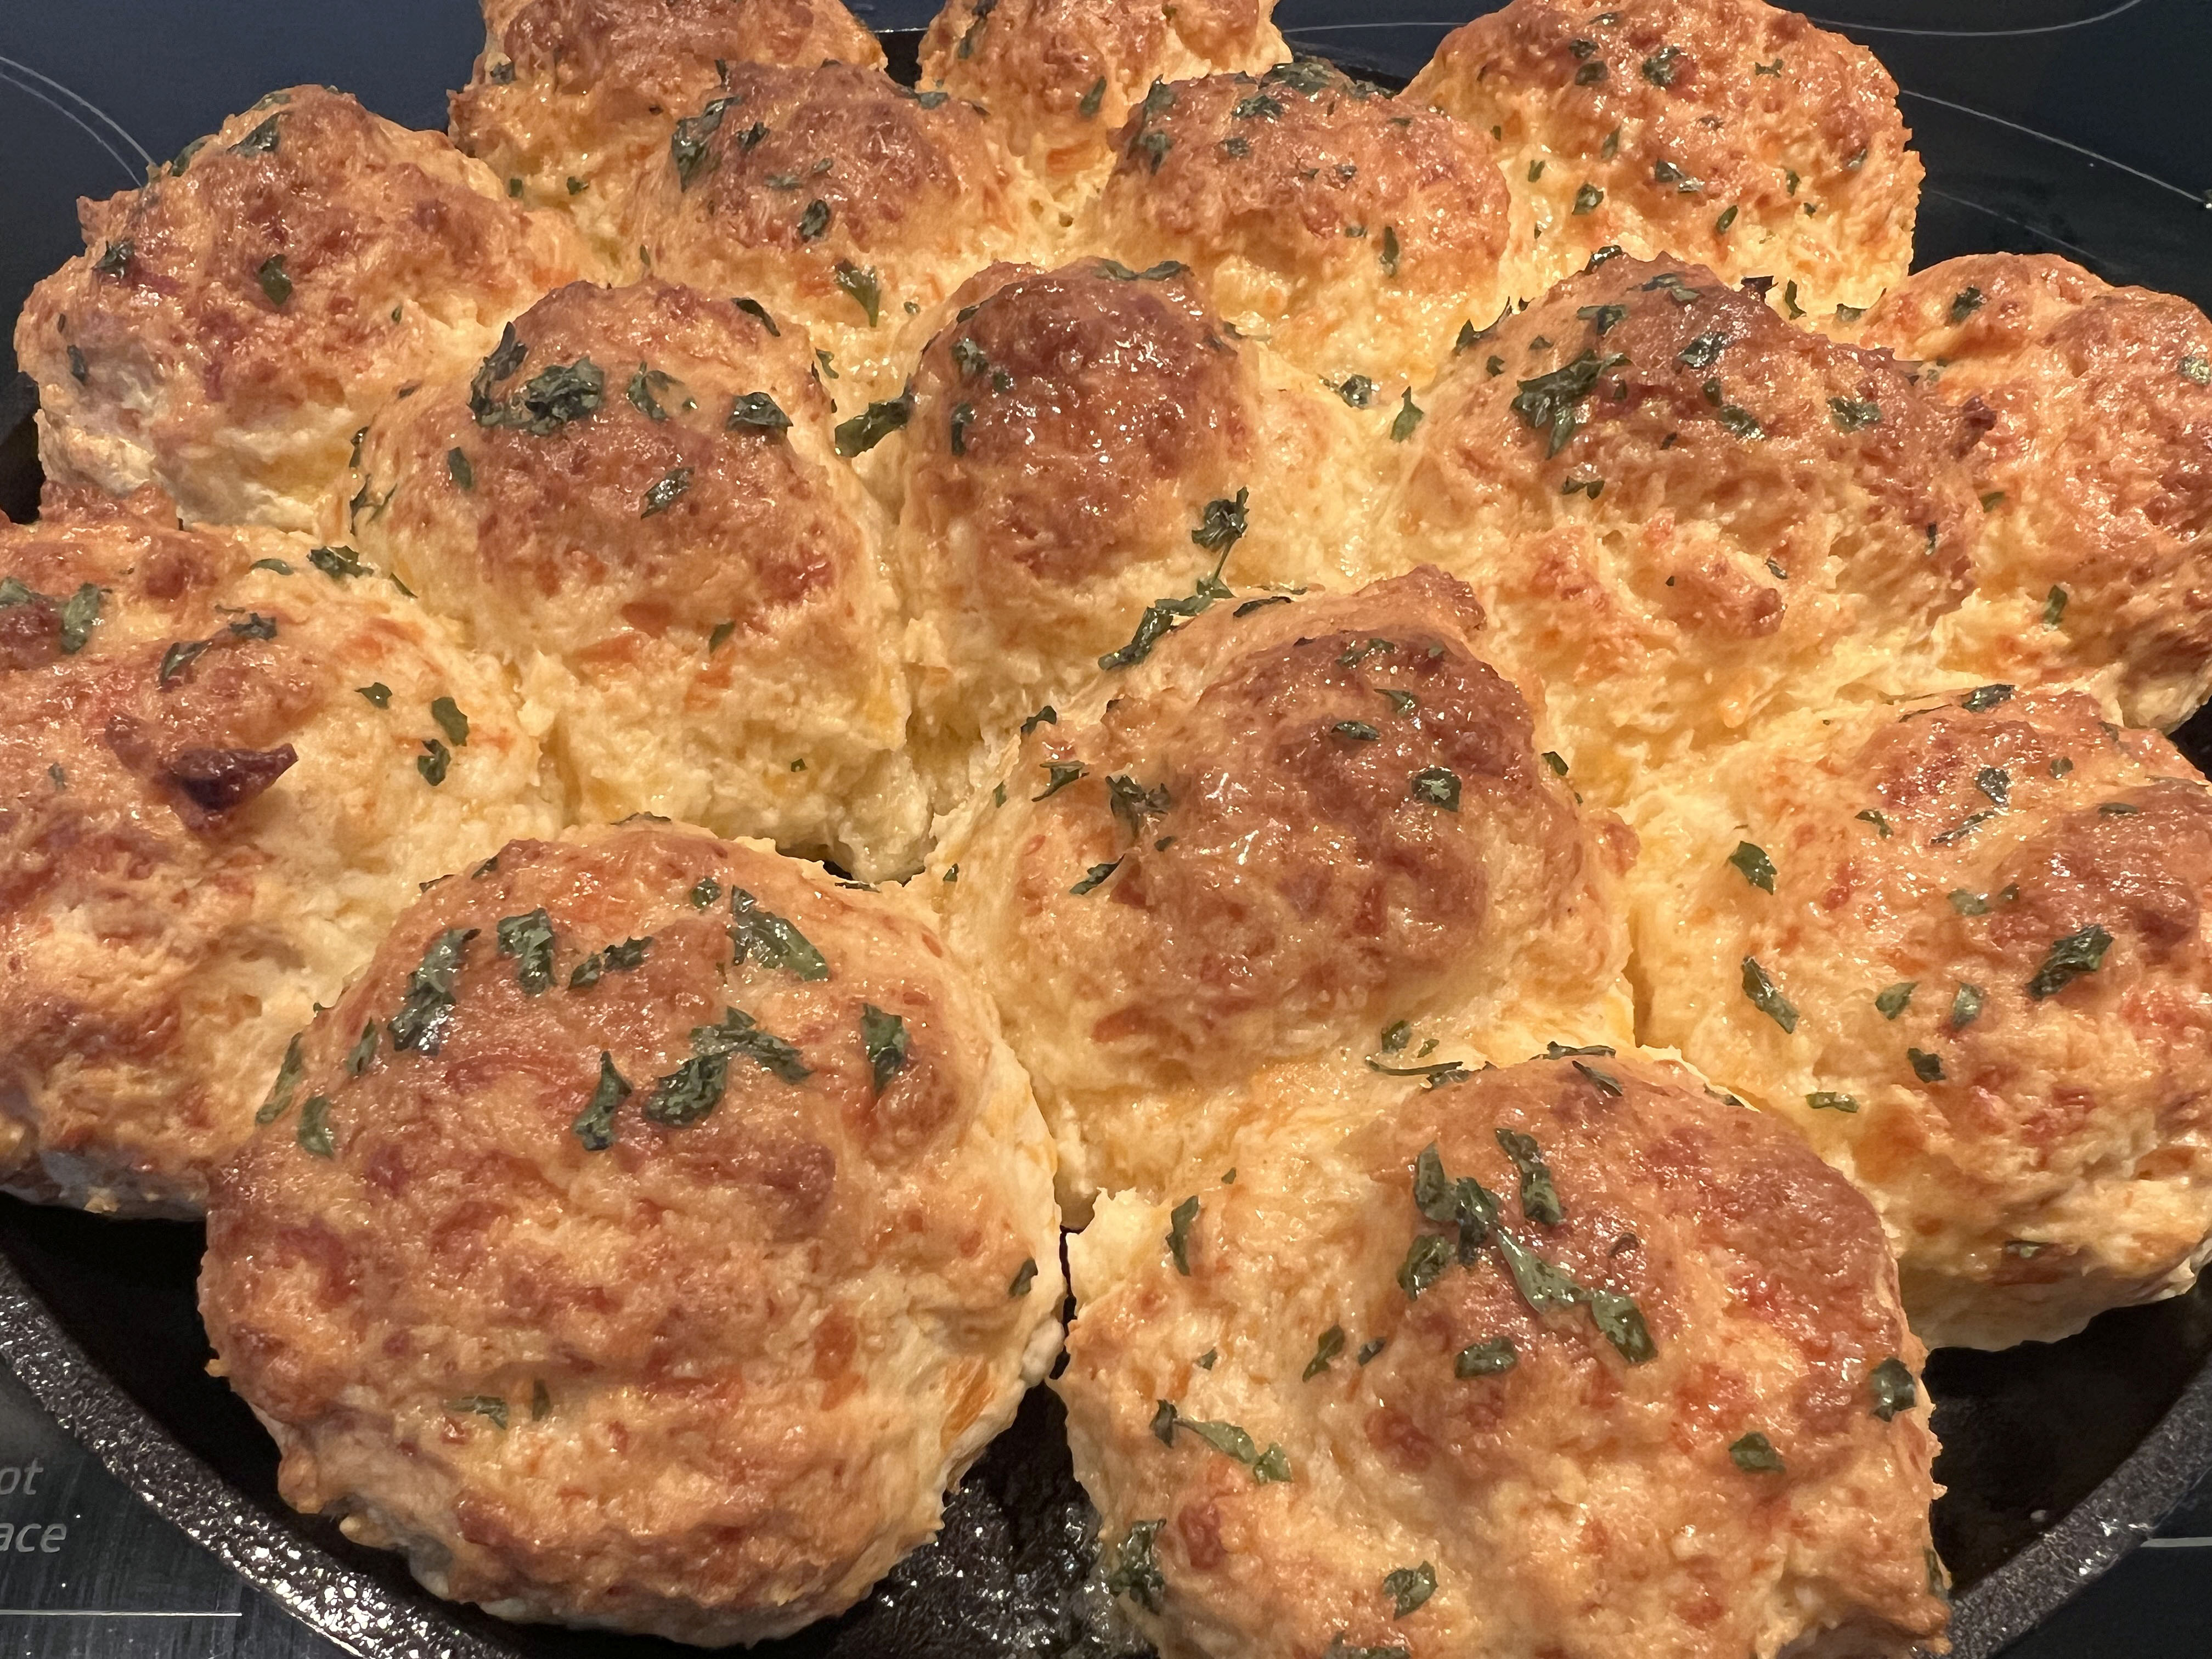
Mountain Cookin' with Missy: Garlic Cheddar Biscuits


Yes, I know I already have a version of the famous Red Lobster Cheddar Bay Biscuits on this blog.  No, you can never have too many recipes for hot cheddar biscuits brushed with melted butter.  And I love that these are cooked on a cute round cast iron griddle.  I might have bought one just because I had so much FOMO after seeing it for the first time.

Garlic Cheddar Biscuits
From Mountain Cookin' with Missy

2½ cups White Lily self-rising flour
¼ cup (½ stick) cold unsalted butter, shredded on a cheese grater
½ teaspoon garlic powder
1 heaping cup shredded sharp Cheddar cheese
¾ cup buttermilk

Topping:
¼ cup (½ stick) salted butter, melted
¼ teaspoon garlic powder, or more to taste
½ teaspoon dried parsley

Preheat oven to 400°F. Generously butter a 10-inch flat round cast iron griddle.

Put the flour in a medium bowl, then add shredded butter, garlic powder, and cheese and briefly mix together. Add the buttermilk and stir until the dough is sticky. With floured hands, pinch biscuits from the dough, about 1½ to 2 inches in diameter, and roll each biscuit into a ball. Start laying the biscuits in the middle of the griddle, then add the remaining biscuits in a circle around the first one. Bake for 20 to 25 minutes, or until tops are light brown.

While biscuits are cooking, mix together all topping ingredients. Brush the butter mixture on the hot biscuits as soon as they come out of the oven.

Makes 12 biscuits