Sunday, April 30, 2023

Better Homes and Gardens New Cookbook: Fudge Brownies


I really can't believe that I haven't put this recipe on my blog yet.  These brownies were a staple of my childhood, and I still have the recipe memorized.  I even made them for a high school friend who paid me for a pan of them.  They're basic but delicious.

Note: You can substitute ¼ cup cocoa powder for ¼ cup of the flour, and it will really pump up the chocolate flavor.  Also, ½ teaspoon espresso powder wouldn't hurt either.  And if you happen to press some chocolate squares into the batter and sprinkle some Maldon salt on top before baking, it wouldn't be a terrible thing, either.

Fudge Brownies
From the 1974 edition of the Better Homes and Gardens New Cookbook

½ cup (1 stick) unsalted butter
2 (1-ounce) squares unsweetened chocolate
1 cup granulated sugar
1 teaspoon pure vanilla extract
2 large eggs
¾ cup sifted all-purpose flour
½ cup chopped walnuts

Preheat the oven to 350°F.

In a medium saucepan, melt the butter and chocolate. Remove from the heat; stir in the sugar. Blend in the eggs, one at a time. Add the vanilla. Stir in the flour and nuts; mix well. Spread in a greased 8x8-inch pan. Bake for 25 to 30 minutes. Cool.

Makes 16 servings


Sunday, April 23, 2023

'Ono Hawaiian Recipes: Okinawan Sweet Potato Haupia Pie


In one of my recent trips to the grocery store, I came across a small bin labeled "Hawaiian sweet potatoes".  I did not actually know what that meant, but I bought them anyway, as is my usual process.  Imagine my surprise when I found out that they're actually purple inside!  Well, I figured the best way to let these shine was in a Hawaiian dessert, such as this one, with the traditional coconut haupia pudding as the top layer.  I was honestly a bit shocked how delicious this was.  Everything in this dessert comes together perfectly, from the crunchy cookie base, to the beautiful purple filling, to the coconut gelatin topping.  Perfectly sweet and satisfying.

Okinawan Sweet Potato Haupia Pie
From 'Ono Hawaiian Recipes blog

Shortbread Crust:
2 cups all-purpose flour
½ cup granulated sugar
1 cup (2 sticks) unsalted butter, chilled and cubed
¾ cup macadamia nuts, if desired

Sweet Potato Filling:
½ cup (1 stick) unsalted butter, softened
1 cup granulated sugar
2 large eggs
2 cups mashed Okinawan sweet potatoes
½ cup evaporated milk
1 teaspoon vanilla extract
½ teaspoon kosher salt

Haupia Topping:
1 (14-ounce) can coconut milk
1 cup whole milk
1 cup water
½ cup cornstarch
1 cup granulated sugar
Whipped cream (optional)

Shortbread Crust:
Preheat the oven to 350°F.

In a large bowl combine the flour, sugar, and chilled butter cubes. Chop the ingredients up using a pastry blender until it starts to have a crumbly texture. Pour the mixture into a 9x13-inch pan and evenly spread it out. Flatten the crust using either your hand or a flat object. Bake for 15 to 20 minutes.

Sweet Potato Filling:
Boil the potatoes until it is tender enough to pierce a fork through. Peel and mash the potatoes in a large bowl. Measure out two cups of the mashed potatoes.

Cream the butter and sugar. Then add in the eggs and mix. Gradually mix in the mashed potatoes. Lastly add in the evaporated milk, vanilla extract, and salt. Mix well. Pour onto the baked crust and bake again for 30 to 35 minutes.

Haupia Topping:
Combine coconut milk, milk, water, cornstarch, and sugar. Whisk until there are no clumps and sugar particles. Heat it over medium heat and consistently stir until it thickens and bubbles. Turn off heat and let it cool for a few minutes. Pour onto the sweet potato filling and make sure it has spread out evenly. Let it chill in the fridge until the haupia firms up. About and hour or two.  Top with whipped cream, if desired.

Tuesday, April 18, 2023

Nobu Matsuhisa: Black Cod with Miso


If you are any type of foodie, I'm sure you you've heard about this fish.  It has made the rounds of just about every blog and subreddit and morning show cooking segment that I can think of.  And why?  Because it's delicious.  There's something about this marinade that brings out the absolute best in this fish.  And even though it's faintly sweet, which you would think is weird with fish, it just works.  Now, I'm not sure how often this dish is going to make an appearance in my kitchen due to the absolutely ridiculous price of black cod/sablefish, but it's definitely yummy enough for special occasions.

Black Cod with Miso
From Nobu Matsuhisa, as seen in Today's Kitchen Cookbook

4 black cod fillets, about ½ pound each
3 cups Nobu-style Saikyo Miso

Nobu-style Saikyo Miso:
¾ cup sake
¾ cup mirin
2 cups white miso paste
1¼ cups granulated sugar

Bring the sake and mirin to a boil in a medium saucepan over high heat. Boil for 20 seconds to evaporate the alcohol. Turn the heat down to low and add the miso paste, mixing with a wooden spoon. When the miso has dissolved completely, turn the heat up to high again and add the sugar, stirring constantly with the wooden spoon to ensure that the bottom of the pan doesn't burn. Remove from heat once the sugar is fully dissolved. Cool to room temperature.

Pat fillets thoroughly dry with paper towels. Slather the fish with Nobu-style Saikyo Miso and place in a non-reactive dish or bowl and cover lightly with plastic wrap. Leave to steep in the refrigerator for 2 to 3 days.

Preheat oven to 400°F. Preheat a grill or broiler.

Lightly wipe off any excess miso clinging to the fillets but don't rinse it off.  Place the fish on the grill or in a broiler pan, and grill or broil until the surface of the fish turns brown. Then bake for 10 to 15 minutes.

Arrange the black cod fillets on individual plates.  Add a few extra drops of Nobu-style Saikyo Miso to each plate.

Makes 4 servings

Monday, April 17, 2023

Martha Stewart: Sautéed Mushroom Butter and Bacon Tea Sandwiches


I have a confession.  I didn't really make this recipe.  Well, not exactly to the specifications below.  I had extra mushroom butter from when I made asparagus two weeks ago, and I knew I wanted to use it up (because dang, mushroom butter is special, and butter ain't cheap), so I deliberately looked for recipe ideas.  I also added some tomatoes to the sandwich and made it a regular sandwich, so there's that.  It was...a lot.  The bacon plus the butter made my arteries seize up a bit.  I recommend you go with mayonnaise when you do a BLT.  However, I also made a version with the mushroom butter, cold rotisserie chicken breast, and mixed sprouts (above, on right).  That one was much better, and I recommend it.

Sautéed Mushroom Butter and Bacon Tea Sandwiches
From Martha Stewart

1 cup (2 sticks) unsalted butter, softened
1 tablespoon olive oil
1 pound shiitake mushrooms, cleaned, tough ends of stems removed, diced
Kosher salt and freshly ground black pepper
¼ cup Madeira or sherry
24 thin slices whole-wheat bread
1½ pounds (about 24 slices) bacon, cooked
1 bunch arugula, cleaned and trimmed

In a large skillet over medium heat, heat 2 tablespoons butter and the oil. Add mushrooms, and season with salt and pepper; sauté until mushrooms begin to soften and juices evaporate, about 8 minutes. Add Madeira, and remove from heat; deglaze pan, stirring with a wooden spoon until liquid has evaporated. Let cool, and place in the bowl of a food processor fitted with the metal blade. Add remaining butter; pulse until mushrooms are finely chopped, about 1 minute.

Thinly spread two slices of bread with mushroom butter; cover one slice with a single layer each of bacon and arugula, and top with other bread slice. Use a serrated knife to trim crusts and cut in half diagonally into two triangles. Cover with damp paper towels until ready to serve. Repeat with remaining ingredients.

Makes 2 dozen

Sunday, April 16, 2023

Giacomo Sgroi: Chilean Sea Bass with Montalcino Sauce


Ever since I saw a beautiful fillet of sea bass for sale at Costco, I've been trying to think of a fun way to use it.  And what better than topped with a crab sauce?  While it looks somewhat complicated, it's actually not that bad to throw together, and somehow the sweetness of the fish works really well with the sweetness of the crab and the sweetness of the tomato sauce.  I served it with some wilted arugula for contrast, and it was fantastic, but you can always do pasta.

Note: Since I am not an Italian restaurant, and I do not have a multitude of sauces bubbling away at all times, I used canned Cento white clam sauce in this recipe.  It was still delicious.

Chilean Sea Bass with Montalcino Sauce
From Giacomo Sgroi of Nonna Sulina's Sicilian Kitchen, as seen at Lehigh Valley Style

¼ cup extra virgin olive oil, plus 1 tablespoon, divided use
1¼ red onion, sliced
1½ tablespoons golden raisins
1 tablespoon toasted pine nuts
4 large basil leaves, sliced thin in chiffonade
¾ cup crushed and peeled Italian tomatoes with basil
½ cup Pinot Grigio/Pinot Gris
¾ cups white clam sauce
¼ cup water
Pinch of kosher salt, freshly ground black pepper, and granulated sugar
¼ cup jumbo lump crabmeat
4 (4-ounce) Chilean sea bass portions
½ cup (1 stick) unsalted butter
2 cloves garlic
2 sprigs thyme, plus more for garnish

Preheat oven to 450°F.

Heat ¼ cup olive oil in a medium skillet over medium heat. Add onions and sauté until light brown. Add raisins, pine nuts, basil leaves, and crushed Italian tomatoes. Stir frequently and simmer for two minutes. Add wine, clam sauce, water, salt, pepper, sugar, and crabmeat. Stir frequently and simmer for two more minutes, then set aside.

Pat fish dry with a towel to remove excess water. Season with salt and pepper on both sides.

In a medium skillet over medium heat, melt the butter and remaining 1 tablespoon olive oil until golden. Place the fish gently in frying pan. Add garlic and thyme. Cook fish for 2 to 3 minutes on each side, depending on thickness, until golden brown, while continuously spooning butter over fish. When done, remove fish and place in the skillet with the prepared sauce and spoon sauce over fish until well coated. Add a few sprigs of thyme on top and put in preheated oven for 10 to 12 minutes. (Oven temperatures and cooking times vary. Start checking at eight minutes for doneness. Sauce will thicken when sufficiently cooked.) Serve immediately.

Makes 4 servings

Martha Stewart: Wilted Arugula


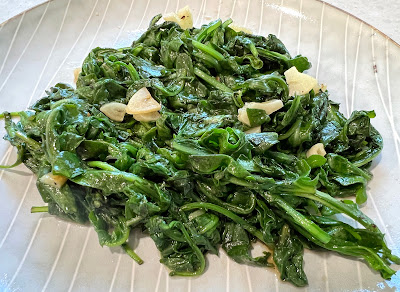
I bought some arugula for some sandwiches I wanted to make, but you have to buy arugula in this big clamshell that always have infinitely more than you will ever eat in your lifetime, and especially not before the whole thing rots.  Luckily I also found this recipe that allowed me to throw the whole mess in a pan and cook it down to almost nothing the way greens seem to do.  It's like sautéed spinach, but with the peppery bite of arugula.  Not bad for a recipe to save on waste.

Wilted Arugula
From Martha Stewart

1 tablespoon extra-virgin olive oil
2 garlic cloves, thinly sliced
8 ounces baby arugula, rinsed and drained well
1 tablespoon balsamic vinegar
¼ teaspoon kosher salt
Freshly ground black pepper

Heat oil in a large skillet over medium heat. Add garlic; cook, stirring constantly, until garlic is fragrant but not browned, 2 to 3 minutes. Add arugula; cook, stirring constantly, until slightly wilted, 1 to 2 minutes. Add vinegar; cook, stirring constantly, until most of the vinegar has evaporated, about 1 minute. Stir in salt; season with pepper. Serve immediately.

Makes 4 servings

Monday, April 10, 2023

Vikalinka: Tushenaya Kapusta тушеная капуста (Russian Braised Cabbage)


I know that Russia is struggling a bit lately with an reputation problem, and I'm sure many people would probably wonder why I'm making something from that country given everything that's been happening in Ukraine the last year, but I choose to believe that hidden underneath all the terrible leaders and authoritarian bluster, the Russian people are probably very much like us.  Plus, they have some really delicious food, and I had a savoy cabbage sitting in my fridge, staring at me.  This is a fantastic way to turn that cabbage into an umami bomb, and with just the bacon for flavoring, it's almost a meat-free meal.

Note: I had to add about 1 teaspoon of Diamond Crystal kosher salt at the end, but always add to taste, because your bacon and chicken stock might be saltier than mine.

Tushenaya Kapusta тушеная капуста (Russian Braised Cabbage)
Adapted from Vikalinka blog

¼ cup dried porcini mushrooms
½ pound bacon, sliced into batons
1 medium onion, diced
3 cloves garlic, minced
½ pound fresh cremini mushrooms, sliced
1 to 2 tablespoons unsalted butter, if needed
1 cup chicken stock
1 (1½-pound) Savoy cabbage, cored and sliced
2 tablespoons tomato paste
1 bay leaf
½ teaspoon freshly ground black pepper
3 tablespoons sour cream
Kosher salt, to taste
1 tablespoon each: fresh chopped Italian flat-leaf parsley and dill

Soak the dried mushrooms in 1 cup boiling water and set aside for one hour to rehydrate.  Once rehydrated, drain and chop the mushrooms.

In a large and deep pan, cook bacon until fat is rendered, then remove from the pan with a slotted spoon and set aside.

To the same pan with the bacon fat, add onions and cook on medium heat for 5 to 7 minutes until slightly colored, then add garlic and mushrooms and sauté until the mushrooms are soft. If there doesn't seem to be enough bacon fat, add 1 to 2 tablespoons of butter. Add the stock and scrape the bottom of the pan with a wooden or plastic spatula to release the brown bits into the stock.

Add sliced cabbage, rehydrated mushrooms, cooked bacon, tomato paste, bay leaf, and pepper, stir to combine, lower the heat and cover with a lid. (If the cabbage doesn’t fit in the pan, add ⅔ of the amount and cover with a lid for 10 minutes, then add the rest when the volume of the cabbage in the pan goes down.) Braise the cabbage for 1 hour to 1 hour 15 minutes with a lid on while stirring once in a while to prevent the bottom from burning.

At the end of the cooking time the volume of the cabbage should have reduced by roughly half and the color should turn from bright green to golden brown. There should be no liquid left in the pan. Stir in sour cream and warm through for 1 minute.

Season with salt last, as it’s easy to oversalt in the beginning stage when the volume of cabbage is significantly higher.

Sunday, April 09, 2023

Emma Duckworth Bakes: Easter No-Bake Mini Egg Cheesecake


This is my busy season at work.  And it is very, very busy.  So busy that I didn't even get to see my family for Easter.  But I didn't want to miss out on all of the delicious chocolate fun, so I found this super fast, super easy cheesecake to make for myself.  No, I don't know how I'm going to finish all this myself, but stress eating is a thing.

Note: Don't put the extra decorative eggs on until the last minute - the shell will melt the longer it stays in the fridge.

Easter No-Bake Mini Egg Cheesecake
From Emma Duckworth Bakes blog

1 (14.1-ounce) package digestive biscuits (or graham crackers)
½ cup (1 stick) unsalted butter, melted
3 (8-ounce) packages cream cheese
2 cups heavy cream
1½ powdered sugar
2 teaspoons vanilla bean paste
½ teaspoon kosher salt
18 ounces Cadbury Mini Eggs

Line the base of a 9-inch springform pan with parchment paper. Add the digestive biscuits to the bowl of a food processor and pulse until the biscuits are crumbled finely. Pour in the melted butter and pulse again until the crumbs resemble wet sand.

Pour into prepared pan and refrigerate. Pour the biscuit crumbs into the prepared springform tin and pack the crumbs into the base and up the sides. They need to be as compacted as possible so that they don’t crumble when cutting the cheesecake later. I recommend using a ⅓ measuring cup for this.
Refrigerate the base for 30 minutes minimum or freeze for 15 minutes whilst you make the filling.

In a medium-sized bowl, add the cream cheese and using a stand mixer fitted with the paddle attachment, beat on medium speed until smooth and creamy. Scrape down the base and sides of the bowl with a rubber spatula. Into the cream cheese mixture, sift in the powdered icing sugar, and add vanilla bean paste and salt and beat on medium speed until smooth, creamy, and combined.

In a separate medium-sized bowl, add the cold cream and using hand-held electric beaters fitted with the whisk attachment, whip on medium-high speed until stiff peaks form. Add the whipped cream to the cream cheese mixture and fold through with a rubber spatula until fully combined. Take care not to deflate all the air in the whipped cream by over mixing.

Crush 12 ounces of the mini eggs, add to the filling and fold through with a rubber spatula until evenly distributed. Remove the biscuit crust from the refrigerator, or freezer, and pour the vanilla cream cheese filling into it. Smooth the filling throughout the base and use an offset spatula to smooth off the top. Cover tightly in plastic wrap and refrigerate the cheesecake for a minimum of 6 hours, but recommended to leave it overnight. This gives it the best chance to firm up.

Remove the cheesecake from the fridge, then using a knife, run the blade around the edge to loosen it, then release the springform pan rim and remove it carefully. Slide the base onto your serving plate.
Decorate with the remaining 6 ounces of the mini eggs, chocolate shavings (optional), and edible flowers (optional).

Saturday, April 08, 2023

Allrecipes: Mocha Chocolate Chip Banana Muffins


I forget how I came across the recipe, but I am certainly glad I did.  I rarely buy bananas because I only like eating them for one short period between green and spotted, but if you manage to wait patiently for just the right amount of sweetness, they are perfect in this muffin.  They are like little individual banana breads, super tender and sweet, with a crunchy top that just works perfectly.

Mocha Chocolate Chip Banana Muffins
Adapted from Allrecipes

1 cup unsalted butter, at room temperature
1¼ cups granulated sugar
1 large egg
3 ripe bananas, peeled and mashed
1 tablespoon instant espresso granules, dissolved in 1 tablespoon water
2 teaspoons pure vanilla extract
2¼ cups all-purpose flour
½ teaspoon kosher salt
1 teaspoon baking powder
1 teaspoon baking soda
1 cup mini semisweet chocolate chips

Preheat oven to 350°F. Line 21 to 24 muffin cups with paper or foil liners.

In the bowl of a stand mixer, using the paddle attachment, blend butter and sugar until well mixed and fluffy.  Add the egg, bananas, dissolved coffee, and vanilla extract and mix well. Add flour, salt, baking powder, and soda, and blend just until flour disappears. Remove the bowl from the stand mixer, and using a wooden spoon or spatula, add chocolate chips and mix in. Spoon the mixture into the prepared cups, filling about ⅔ full.

Bake for 25 minutes. Cool on wire racks.

Makes 21 to 24 muffins

Saturday, April 01, 2023

New German Cooking: Spargel mit Steinpilzbutter und Mandeln (White Asparagus with Porcini Mushroom Butter and Almonds)


I ran across some really beautiful white asparagus on a trip to the grocery store, and never having eaten or cooked it, it was a bit too tempting to ignore.  I knew white asparagus was pretty big in German cooking, so I reflexively turned to my German cookbooks.  And boy did I hit the jackpot with this recipe.  It seems super simple - it's just a compound butter and almonds on top - but somehow it all works together to be more than the sum of its parts.

Spargel mit Steinpilzbutter und Mandeln (White Asparagus with Porcini Mushroom Butter and Almonds)
From New German Cooking

½ ounce dried porcini mushrooms
½ cup (1 stick) unsalted butter, at room temperature
Kosher salt
¼ teaspoon freshly ground black pepper
1½ teaspoons finely chopped fresh curly-leaf parsley
1 pound white asparagus
¼ cup slivered blanched almonds, toasted

Soak the mushrooms in hot water to cover until soft, about 1 hour. Drain well, squeeze out the excess liquid, and then coarsely chop. In a food processor, combine the mushrooms, butter, ½ teaspoon salt, and the pepper and puree until smooth. Add the parsley and pulse just until incorporated.

Lay a sheet of waxed paper on a work surface.  Scoop the butter mixture onto the paper, spreading it in a lengthwise strip on the sheet and leaving about 1 inch uncovered on each end.  Roll the paper around the butter, pressing against the paper lightly to shape the butter into a long, even cylinder.  Grasp the ends and twist in opposite directions to seal closed.  Refrigerate the butter for up to 2 weeks.

Using a vegetable peeler, peel each asparagus spear from just below the tip to the base, removing the tough skin.  Snap off the woody base from each spear where it breaks easily and then even the ends with a paring knife.

Fill a medium saucepan two-thirds full with water, bring to a boil over high heat, and season with salt.  It should not be too salty; instead, it should be seasoned just enough to resemble a good chicken stock.  Plunge the asparagus into the boiling water and cook until tender, 8 to 10 minutes; the timing depends on the size of the asparagus.

Drain the asparagus and arrange on a platter.  Top with the porcini butter and the almonds.  Serve immediately.

Makes 4 to 6 servings