Saturday, December 31, 2022

Bread Booze Bacon: Bourbon Bacon Roast Beef Sliders


I told you I was going to make something else out of the candied bacon I did back in November.  And it was difficult, I promise you, keeping that bacon frozen and out of my mouth hole.  Because it is fantastic.  But so are these sandwiches.  If there is a pack of hungry meat-eating guys in your family, I highly recommend you feed them this.  It will go over well.

Bourbon Bacon Roast Beef Sliders
Adapted from Bread Booze Bacon blog

6 tablespoons unsalted butter, divided use
1 large sweet onion, chopped
Kosher salt, to taste
1 (12-ounce) package King's Hawaiian rolls
1 pound thinly sliced roast beef
4 slices Whiskey Candied Bacon, chopped
6 sharp Cheddar cheese slices
½ teaspoon granulated garlic
½ teaspoon onion powder
Black poppy seeds

Preheat oven to 350°F.

Heat three tablespoons of butter in a heavy saucepan over medium-high heat.  Once the butter is melted, add the onions.  Lower the heat to medium or medium-low, and cook the onions, stirring often, until brown and caramelized, possibly up to an hour.  Season with kosher salt while cooking.  Set aside.

Cut the rolls in half to form tops and bottoms, and place the bottom half of the rolls in a greased 13x9-inch baking dish.  Place a layer of roast beef over the bottom rolls.  Top with a layer of cheddar cheese slices, about half a slice per roll. Finish with a layer of Whiskey Candied Bacon pieces and a spoon of the caramelized onions. Place the top of the rolls on the sandwiches.

Cover the dish with foil and bake for 10 minutes, then remove the foil.  Melt the remaining 3 tablespoons of butter and mix it with the granulated garlic and onion powder. Brush the rolls with the melted butter mixture and sprinkle with poppy seeds.  Continue baking for another 10 minutes.

Makes 12 sandwiches

Friday, December 30, 2022

Serious Eats: Gideon's Bakehouse Kris Kringle Cookie Knockoff


As my second Christmas cookie this year, I wanted to replicate a cookie that I had seen online, but have never actually eaten.  So I honestly don't know if this is what they taste like.  But these were super delicious, big as your hand, and just this side of too sweet.  Lots of white chocolate going on, and all the other flavorings working in the background for a pretty delicious cookie.  One of these is probably the same as 3 regular cookies, so take your time.

Note: For the finely ground coffee, I used the contents of a couple of Keurig K-cups in the flavor Green Mountain Caramel Vanilla Cream.

Gideon's Bakehouse Kris Kringle Cookie Knockoff
Adapted from Serious Eats

½ cup (1 stick) unsalted butter, softened
½ cup granulated sugar
½ cup packed light brown sugar
1½ teaspoons finely ground coffee
2 teaspoons pure vanilla extract
½ teaspoon coconut extract
½ teaspoon caramel extract
¼ teaspoon white chocolate extract (optional)
2 teaspoons Diamond Crystal kosher salt
1¾ teaspoons baking powder
1 teaspoon baking soda
2 large eggs, straight from the fridge
2¼ cups all-purpose flour
2 cups white chocolate chips, divided use
Coarse sanding sugar
Edible glitter  

Combine butter, granulated sugar, brown sugar, coffee, all flavoring extracts, salt, baking powder, and baking soda in the bowl of a stand mixer fitted with a paddle attachment.

Mix on low to moisten, then increase speed to medium and beat until soft, fluffy, and pale, about 8 minutes; halfway through, pause to scrape bowl and beater with a flexible spatula. With mixer running, add eggs one at a time, letting each incorporate fully before adding the next. Reduce speed to low, then add the flour all at once. When flour is incorporated, add 1 cup of the white chocolate chips and keep mixing until dough is homogeneous.

Divide dough into 6 equal portions (about 5 ounces each) and round each into a smooth ball. Dip the tops of the dough balls in the remaining 1 cup white chocolate chips, pressing to ensure they adhere. Wrap in plastic and refrigerate at least 12 hours before baking.

Adjust oven rack to middle position and preheat to 350°F. Line an aluminum half-sheet pan with parchment paper.

When the oven comes to temperature, arrange up to 4 portions of cold dough on the prepared pan, leaving ample space between them to account for spread. Sprinkle evenly and generously with the sanding sugar.

Bake until cookies are puffed and lightly brown, about 22 minutes, or to an internal temperature of between 175 and 185°F. The ideal temperature will vary from person to person; future rounds can be baked more or less to achieve desired consistency.

Cool cookies directly on baking sheet until no warmer than 100°F before serving. Sprinkle with edible glitter.  Enjoy warm, or within 12 hours; these cookies taste best when freshly baked.

Makes 6 very large cookies

Houston Chronicle: Spumoni Refrigerator Cookies


I'm a little embarrassed that I'm making Christmas cookies after Christmas, but here we are.  I knew that I wanted to make something very retro and obnoxious this year, and what could be more retro and obnoxious than cookies that are bright pink and green?  And I got to throw those ultra-red maraschino cherries into the mix.  These are about as 70's as anything else I could find.  And they're actually pretty good.  Not very sweet, lots of interesting things going on, and as a slice-and-bake cookie, not terribly hard to make.

Spumoni Refrigerator Cookies
Adapted from the Houston Chronicle, December 8, 2020, as submitted by Cindy Cannon Albert for the Great Holiday Bake contest

1 cup unsalted butter, softened
½ cup granulated sugar
1 teaspoon pure vanilla extract
¼ teaspoon almond extract
2 large eggs
2¼ cups all-purpose flour
½ teaspoon kosher salt
¼ cup chopped unsalted pistachios
4 drops green food coloring
1 (1-ounce) square unsweetened chocolate, melted and cooled
¼ cup mini chocolate chips
3 tablespoons drained and chopped maraschino cherries
1 drop red food coloring

In the bowl of a stand mixer with the paddle attachment, cream butter and sugar on medium speed until fluffy. Add extracts and mix to combine. Add eggs, one at a time, until well combined. Add flour and salt, and mix on low speed until partially combined, then increase speed back to medium to finish incorporating.

Line the bottom and ends of a 9x5-inch loaf pan with aluminum foil, allowing the ends to extend over the edges of the pan. This will make removing the dough easier.

Divide the dough into three equal portions, approximately 9 ounce each. Combine one portion with the chopped pistachios and green food coloring, the second portion with the melted chocolate and chocolate chips, and the third portion with the cherries and red food coloring. Mix well to insure the ingredients are fully incorporated and there are no streaks in the dough.

Press the green dough evenly in the bottom of the prepared loaf pan. Press the chocolate dough directly on top of the green dough in an even layer. Follow with the cherry dough, ensuring everything is even. Cover the top with plastic wrap pressed directly onto the dough and refrigerate for at least 2 hours, but not longer than 6 hours.

Preheat the oven to 375°F.

Remove the dough from the refrigerator and remove the plastic wrap. Pull the dough out of the loaf pan using the foil to assist, then remove the foil. Using a sharp knife, cut ¼-inch slices from the loaf and then cut those slices in half. Place slices about 1 inch apart on ungreased cookie sheets. Bake until set, about 10 to 12 minutes. Remove and let cool.

Makes about 3 dozen cookies

Thursday, December 29, 2022

Darius Cooks: Creamed Spinach Tortellini with Shrimp


When I saw the picture of this dish on Pinterest, I knew what I needed to do with the shrimp and the spinach tortellini I had sitting in my fridge.  I didn't quite follow the original recipe since I had some fresh spinach and some beautiful Gruyere that I needed to find a home for, but I think it still turned out beautifully.  The seasoned shrimp are the perfect foil for the creamy sauce and tender pasta.

Creamed Spinach Tortellini with Shrimp
Adapted from Darius Cooks

1 (8.8-ounce) package spinach and cheese stuffed tortellini
3 tablespoons unsalted butter
2 tablespoons all-purpose flour
1½ cups half-and-half
3 teaspoons Badia complete seasoning, divided use
1½ teaspoon roasted garlic powder, divided use
½ teaspoon freshly ground black pepper
¼ teaspoon ground nutmeg
Pinch red pepper flakes
1 cup grated Gruyere cheese
2 tablespoons Parmesan
2 tablespoons Pecorino Romano
Kosher salt, to taste
8 ounces fresh baby spinach or 1 (10-ounce) package frozen chopped spinach, cooked and well drained
1 pound large shrimp, peeled and deveined, tail left on if desired
1 tablespoon Old Bay seasoning
Olive oil, for frying the shrimp

Cook the tortellini according to the package directions, drain, and set aside.

In a saucepan, over medium heat, melt the butter. When the butter is melted, whisk in the flour and cook for about 90 seconds until the flour taste has cooked out. Then, add in the half-and-half and whisk well to combine. Add 1 teaspoon of the Badia seasoning, ½ teaspoon of the garlic powder, the black pepper, nutmeg, and red pepper flakes. When the sauce has thickened, add the cheeses and check the seasoning for any additional salt that might be needed.  Fold in the spinach and stir until the fresh leaves have wilted, or if using frozen, until well distributed. Fold in the cooked tortellini and keep warm while preparing the shrimp.

Toss the shrimp together with the Old Bay, the remaining 2 teaspoons of Badia seasoning, and the remaining 1 teaspoon of garlic powder. Get a skillet hot, add in the olive oil, and then sauté the shrimp on both sides until they’re cooked through. Serve immediately on top of the pasta.

Makes 4 servings

Tuesday, December 27, 2022

Greedy Gourmet and Lirim Gula: Amaretto Cherries and Lirim Gula: Bourbon Godfather


I originally saw this video somewhere - maybe Pinterest? - but apparently it originated on TikTok, and the drink looked right up my alley.  The author calls this an Old Fashioned, but with the amaretto, it's more of a Godfather, hence the name change here.  The amaretto cherries can definitely also be used as a topping for ice cream or pound cake if you're looking for ways to use them that don't involve alcohol.

Note: Yes, cherry pits contain cyanide, but it's only really a danger if the pit is cracked.  If you're pitting your cherries and you crack open a pit by accident, toss it.  Only use complete pits with no cracks.  If it really bothers you, just make the syrup without the pits.  I used the pits, and I'm still kicking.  For the simple syrup, I used some vanilla bean syrup I had around, but it's not absolutely necessary to go that far.

Amaretto Cherries
Adapted from Greedy Gourmet blog and Lirim Gula of Tasty UK

1 pound sweet cherries
1¼ cups water
2 cinnamon sticks
Peel of one orange, in large strips
¾ cup maple syrup
1 cup amaretto

Pit the cherries and retain the pits, except for any that are cracked or otherwise compromised. Place the cherries in a jar.

Cook the cherry pits in the water, adding the cinnamon stick, orange peel, and maple syrup, until syrupy.  Remove from the heat, strain the liquid, and then mix the syrup with the amaretto.  Pour the syrup over the cherries in the jar, then refrigerate for at least a week before using.

Bourbon Godfather
From Lirim Gula of Tasty UK

2 to 3 dashes chocolate bitters
¾ ounce simple syrup
3 ounces bourbon
1½ ounces amaretto
Toasted orange peel
2 to 3 Amaretto Cherries along with a spoonful of the syrup

Combine all ingredients in a glass with a couple of ice cubes.

Saturday, December 24, 2022

Nigella Lawson: Ultimate Christmas Pudding and The Daring Gourmet: Hard Sauce


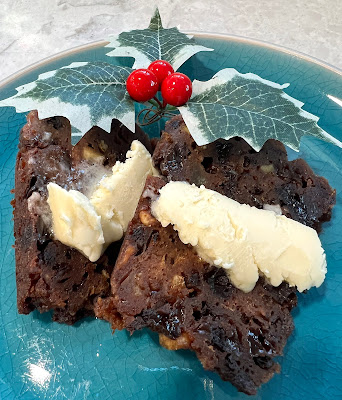
Final recipe of the day, this is #5!  I have wanted to make a traditional British pudding for quite a while, and had honestly intended to do it last year, but my suet took months to arrive from the UK.  And I wanted it to be authentic.  So this year it is!  I went with Nigella Lawson's recipe, and it's everything she promises - flavorful but not super heavy.  I also wanted to do a hard sauce for the first time, and it melts into the hot pudding in the best way.  For what is essentially a fruit cake, this was surprisingly good.

Ultimate Christmas Pudding
Adapted from Nigella Lawson

1¼ cups currants
1 cup golden raisins
½ cup roughly chopped pitted prunes
¾ cup Pedro Ximenez sherry
⅔ cup all-purpose flour
2⅓ cups fresh breadcrumbs
14 tablespoons grated suet or coarsely grated vegetable shortening (freeze overnight to make it easier to grate)
¾ cup dark brown sugar
1 teaspoon ground cinnamon
¼ teaspoon ground cloves
1 teaspoon baking powder
Grated zest of 1 lemon
¼ cup candied orange peel
¼ candied citron
3 large eggs
1 medium apple (peeled and grated)
2 tablespoons honey
½ cup brandy (to flame the pudding)
Hard Sauce (for serving, below)

Put the currants, golden raisins, and scissored pitted prunes into a bowl with the Pedro Ximénez, swill the bowl a bit, then cover with clingfilm and leave to steep overnight or for up to 1 week.

When the fruits have had their steeping time, put a large pan of water on to boil, or heat some water in a conventional steamer, and butter your heatproof plastic pudding basin (or basins), remembering to grease the lid, too.

In a large mixing bowl, combine all the remaining pudding ingredients (except the brandy), either in the traditional manner or just any old how; your chosen method of stirring, and who does it, probably won’t affect the outcome of your wishes or your Christmas.

Add the steeped fruits, scraping in every last drop of liquor with a rubber spatula, and mix to combine thoroughly, then fold in cola-cleaned coins or heirloom charms, if desired. If you are at all frightened about choking-induced fatalities at the table, do leave out the hardware.

Scrape and press the mixture into the prepared pudding basin, squish it down and put on the lid. Then wrap with a layer of foil (probably not necessary, but I do it as I once had a lid-popping and water-entering experience when steaming a pudding) so that the basin is watertight, then either put the basin in the pan of boiling water (to come halfway up the basin) or in the top of a lidded steamer and steam for 5 hours, checking every now and again that the water hasn’t bubbled away.

When it’s had its 5 hours, remove gingerly (you don’t want to burn yourself) and, when manageable, unwrap the foil, and put the pudding in its basin somewhere out of the way in the kitchen or, if you’re lucky enough, a larder, until Christmas Day.

On the big day, rewrap the pudding (still in its basin) in foil and steam again, this time for 3 hours. Eight hours combined cooking time might seem a faff, but it’s not as if you need to do anything to it in that time.

To serve, remove from the pan or steamer, take off the lid, put a plate on top, turn it upside down and give the plastic basin a little squeeze to help unmould the pudding. Then remove the basin — and voilà, the Massively Matriarchal Mono Mammary is revealed. (Did I forget to mention the Freudian lure of the pudding beyond its pagan and Christian heritage?)

Put a sprig of holly on top of the dark, mutely gleaming pudding, then heat the brandy in a small pan and the minute it’s hot, but before it boils — you don’t want the alcohol to burn off before you attempt to flambé it — turn off the heat, strike a match, stand back and light the pan of brandy, then pour the flaming brandy over the pudding and take it as fast as you safely can to your guests. If it feels less dangerous to you, pour the hot brandy over the pudding and then light the pudding. In either case, don’t worry if the holly catches alight; I have never known it to be anything but singed.

Hard Sauce

½ cup (1 stick) unsalted butter, softened but not liquid
1½ cups powdered sugar
2 tablespoons brandy (can substitute rum, cognac, sherry, whiskey)
½ teaspoon pure vanilla extract (optional)

Place the softened butter in a medium mixing bowl and beat for several minutes until pale and fluffy. Add the sugar and continue to beat until smooth. Avoid over-beating otherwise the brandy butter will become oily.

Add the brandy one tablespoon at a time, beating between additions, along with the vanilla. Beat just until combined.

Cover and refrigerate the hard sauce for at least two hours before serving, preferably overnight or maximum flavor. Remove it from the fridge at least a couple of hours before serving so it can come to room temp. The texture should be soft and spreadable. To store it keep it in the fridge where it will last for several months.

Makes a little over 1 cup

Bacardi Rum: Rum Cake


For recipe #4, we're moving on to dessert.  For some reason this rum cake has become a sort of holiday item, so I figured I might as well make one and see how it went.  While I don't normally use cake mixes, with the amount of other items on my list, I decided to stop being so picky and gatekeeping cake baking.  And you know what?  It's delicious.  And pretty easy to pull together.  It's fantastically moist, and not so overwhelming after all that other rich food.

Note:  I misread the recipe and used the 4 eggs and ½ cup oil it recommended for a regular cake mix (without pudding/super moist), and it was still delicious.  Use what you feel is right.

Rum Cake
From an old Bacardi Rum advertisement

Cake:
1 cup chopped pecans or walnuts
1 (15¼-ounce) package super moist yellow cake mix (with pudding)
3 large eggs
½ cup cold water
⅓ cup canola oil
½ cup Bacardi dark rum

Glaze:
½ cup (1 stick) unsalted butter
¼ cup water
1 cup granulated sugar
½ cup Bacardi dark rum

Preheat oven to 325°F. Grease and flour a 10-inch tube pan or a 12-cup Bundt pan.

Sprinkle nuts over bottom of pan. Mix all cake ingredients together.  Pour batter over nuts. Bake 1 hour. Cool.

Invert cake on serving plate. Prick top. Spoon and brush glaze evenly over top and sides. Allow cake to absorb glaze. Repeat until glaze is used up.

To make glaze:

Melt butter in saucepan. Stir in water and sugar. Boil 5 minutes, stirring constantly. Remove from heat. Stir in rum.

The Essential New York Times Cookbook: Gratin of Sweet Potatoes and Chipotle Cream


This is recipe #3 (getting tired yet?), and it honestly turned out much better than I ever expected.  I was a little nervous making a new recipe for such a big dinner, but it seemed simple enough that even if it wasn't superb, it would still be "okay".  Well, I'm a doubter no more.  These sweet potatoes were pretty fantastic - tender, rich, and just the right amount of seasoning.  These will definitely happen again.

Note: The original recipe called for "yams", but since I wasn't about to go to a Caribbean grocery to find real yams, I figured they meant sweet potatoes.  I needed more than 4 servings, so I used 1½ times the recipe below: 2¼ pounds sweet potatoes, 1½ cups heavy cream, 1½ teaspoons adobo sauce.  I baked it in a large square baking dish, and it turned out beautifully.  Also didn't do the decorative cutting into squares - everyone just dug in.  I may have lost an arm if I tried to cut fancy squares while they waited.

Gratin of Sweet Potatoes and Chipotle Cream
Adapted from The Essential New York Times Cookbook

1 cup heavy cream
1 teaspoon adobo sauce from canned chipotles
1½ pounds sweet potatoes, peeled and cut into ⅟16-inch slices
Kosher salt and freshly ground black pepper

Heat the oven to 375°F. Whisk together the cream and adobo sauce in a bowl until smooth.

Arrange a thin layer of the sweet potatoes in an 8½x4½-inch terrine or loaf pan. Season with a little salt and pepper and spoon over a little of the cream mixture. Repeat, layering the remaining sweet potatoes and cream mixture, seasoning every other layer. Press firmly on the gratin to compact the layers.

Cover the terrine with aluminum foil and bake for 30 minutes. Remove the foil and continue baking for 35 to 40 minutes, or until most of the cream has been absorbed and the yams are tender and browned. Remove from the oven and let rest for 10 minutes.

Cut the gratin into 4 rectangular pieces and carefully transfer to serving plates with a spatula and fork.

Makes 4 servings

Meat Church BBQ: Garlic and Herb Prime Rib with Horseradish Cream


Here we have recipe #2, and let's be honest, the star of the show.  It seems like every grocery store had their beef roasts on prominent display, so I'm sure I'm not the only one who worked on one of these for the big day.  Once again, my fantastic pellet smoker did its thing with very little interaction required of me, and the results were delicious.  And the horseradish sauce was a surprise stand out.

Note: Mine took 4 hours, and it was only 2 bones.  I also cooked it to 125°F so that it would be approaching medium when cut.

Garlic and Herb Prime Rib with Horseradish Cream
From Meat Church BBQ

Bone-in ribeye roast, choice grade or higher
½ cup fresh rosemary leaves, chopped
½ cup fresh Italian flat-leaf parsley leaves, chopped
½ cup fresh tarragon leaves, chopped
¼ cup fresh thyme, chopped
½ cup garlic, minced
¼ cup olive oil
4 tablespoons Dijon mustard
2 to 3 tablespoons Meat Church Holy Cow Rub
Horseradish Cream (below)

Prepare your smoker at 250°F with a medium smoke wood or pellets such as oak, hickory, or pecan.

Combine the oil, herbs, garlic, Dijon mustard, and Holy Cow rub. Add mustard as needed to obtain your desired consistency. Feel free to add more garlic as well. Slather the paste all over the rib roast. Allow to adhere for 1 to 4 hours.

Place your rib roast on the smoker, targeting medium rare in the middle, which is 130 to 135°F. Therefore, smoke the rib roast until you reach an internal temperature of 120°F in the middle, as it will carryover cook a few more degrees. The end result will be medium rare in the middle and medium on the outside ends. This will take approximately 2 to 4 hours, depending on size of roast.

Remove the rib roast from the smoker. Tent the meat with aluminum foil and allow it to rest at least 10 to 15 minutes. The meat will continue to rise another 5 degrees to a final internal temperature between 125 to 130°F. Slice the roast to serve with the Horseradish Cream and enjoy!

Horseradish Cream
2 cups mayonnaise
1 cup sour cream
½ jar fresh horseradish
Squeeze of lemon
3 tablespoons Meat Church Holy Cow

Mix the mayo and sour cream. Add you in your desired amount of horseradish to taste. Add the Holy Cow. Then add a squeeze of lemon juice to brighten it up. Optionally you can add truffle oil if you like.

Baker Bettie: Wassail


Okay, let the Christmas cooking marathon begin!  This is recipe #1, for a delicious drink to keep everyone warm while the rest of the goodies are cooking.  Because you add the alcohol to each individual serving, the main slow cooker stash stays child-safe.  Pretty darn tasty.  And easy.  I'm all about easy this time of year.

Wassail
From Baker Bettie blog

½ gallon apple cider
3 cups pineapple juice
2 oranges, sliced into rounds
⅓ cup honey
4 cinnamon sticks
1 tablespoon whole cloves
1 tablespoon allspice berries
Bourbon, for serving

In a slow cooker, combine all ingredients except for bourbon. Set to HIGH for 2 hours. After 2 hours, set the crockpot to LOW and allow it to sit until and during serving time. When ready to serve, add about a shot of bourbon to each serving, if desired.

Makes 12 servings

Friday, December 23, 2022

Jerusalem: Basic Hummus


I don't know why I decided now was the time to whip up a homemade hummus, but here we are.  Maybe it was the bag of beautiful Rancho Gordo garbanzo beans.  Maybe it was because I needed to make something not specifically linked to a holiday.  Whatever prompted it, I'm pleasantly surprised at how good and yet easy it was.  Biggest hassle is just remembering to soak the beans overnight.

Note: I felt like my dip needed a little more salt and lemon juice; just taste and adjust as you see fit.  I topped mine with a very nice olive oil and some dukkah I had laying around in the fridge, but there are also much fancier versions in the cookbook.

Basic Hummus
From Jerusalem: A Cookbook by Yotam Ottolenghi and Sami Tamimi

1¼ cups dried chickpeas/garbanzo beans
1 teaspoon baking soda
6½ cups water
1 cup plus 2 tablespoons light tahini paste
4 tablespoons freshly squeezed lemon juice
4 cloves garlic, crushed
6½ tablespoons ice-cold water
Kosher salt

The night before, put the chickpeas in a large bowl and cover them with cold water at least twice their volume. Leave to soak overnight.

The next day, drain the chickpeas. Place a medium saucepan over high heat and add the drained chickpeas and baking soda. Cook for about 3 minutes, stirring constantly. Add the water and bring to a boil. Cook, skimming off any foam and any skins that float to the surface. The chickpeas will need to cook between 20 and 40 minutes, depending on the type and freshness, sometimes even longer. Once done, they should be very tender, breaking up easily when pressed between your thumb and finger, almost but not quite mushy.

Drain the chickpeas. You should have roughly 3⅔ cups now. Place the chickpeas in a food processor and process until you get a stiff paste. Then, with the machine still running, add the tahini paste, lemon juice, garlic, and 1½ teaspoon salt. Finally, slowly drizzle in the ice water and allow it to mix for about 5 minutes, until you get a very smooth and creamy paste.

Transfer the hummus to a bowl, cover the surface with plastic wrap, and let it rest for at least 30 minutes. If not using straightaway, refrigerate until needed. Make sure to take it out of the fridge at least 30 minutes before serving.

Makes 6 servings

Wednesday, December 21, 2022

Uglesich's Restaurant Cookbook: Baked Shrimp with Garlic


I think that the most perfect way to cook shrimp is with some sort of butter/garlic mixture.  There's something about those flavors that just works beautifully with shrimp.  This is why scampi is such a popular item at restaurants: everyone else agrees with me.  And even though I have other similar recipes on this blog, I'm never going to turn down trying another version.  This is a pretty quick meal that can be served with almost anything - pasta, rice, cheese grits - you name it.

Baked Shrimp with Garlic
Adapted from Uglesich's Restaurant Cookbook by John Uglesich

¼ cup (½ stick) unsalted butter
¼ cup olive oil
2 tablespoons freshly squeezed lemon juice
1 tablespoon Worcestershire sauce
1 teaspoon kosher salt
¼ teaspoon freshly ground black pepper
1 pound medium shrimp, peeled and deveined, tails left on
8 cloves garlic, chopped
4 tablespoons chopped Italian flat-leaf parsley
½ teaspoon smoked paprika
Grated Parmesan cheese

Preheat oven to 375°F.

Place the butter, olive oil, lemon juice, Worcestershire sauce, salt, and pepper in a small saucepan and cook over low heat for 10 minutes.

Place the shrimp in a baking dish and pour the sauce over the shrimp. Spread the garlic over the shrimp, and then sprinkle with the parsley, paprika, and Parmesan cheese. Bake for 15 minutes.

Makes 4 servings

Sunday, December 18, 2022

Appetizing.tv: Savory Vatrushki (Russian Cheese Buns)


Okay, these cheese buns took a surprising amount of research, but they're pretty darn delicious.  The original content creator is from Romania, and the recipe called for mozzarella and "cow cheese".  Now, last time I checked, there is a plethora of cow's milk cheeses.  I needed to get more specific.  I looked up what would be a common crumbly cow's milk cheese in Romania, and found that there is a cheese called Urdă that is used often.  No Urdă at the store, but it does have a good substitute: Ricotta Salata.  I actually kind of enjoy these little food detective cases, especially when the result makes it worth the investment.

Note:  I had to add an additional 100g of flour on top of the 350g that the original recipe called for.  That seems excessive just for humidity differences (and it's a sunny day today), so I would just start with 350g and work your way up until you have a good elastic dough that isn't sticking to every surface of your hands.

Savory Vatrushki (Russian Cheese Buns)
Adapted from Appetizing.tv

1 cup warm whole milk, approximately 110°F
1¼ teaspoons active dry yeast
2 teaspoons granulated sugar
2¾ to 3⅝ cups (350 to 450g) all-purpose flour
1¾ teaspoons kosher salt, divided use
1 teaspoon granulated garlic
4 large eggs, divided use
6 green onions, thinly sliced, green portions only
1 tablespoon salted butter, softened
2 tablespoons canola oil
5½ ounces shredded mozzarella
3½ ounces crumbly cow cheese, such as Urdă or Ricotta Salata

Whisk together milk, yeast, and sugar; set aside for five minutes to bloom yeast. Add yeast mixture to flour with 1¼ teaspoons salt, garlic powder, and one egg, mix well. Knead mixture into a dough. Add green onion and softened butter and knead again briefly just to combine. Cover and let rise for 1 hour.

Remove dough from bowl, sprinkle lightly with flour, and roll into a cylinder. Divide dough into eight portions, rolling each portion into a ball shape, and place each on a baking sheet lined with parchment paper. Cover and let rise 20 minutes.

Preheat oven to 350°F.

Using a drinking glass with about a 2-inch diameter on bottom dipped in oil, press down on each dough ball to create an indentation. Mix together cheeses, two eggs, and remaining ½ teaspoon salt. Spoon cheese mixture into indentations on dough balls. Beat remaining egg in a small bowl; brush edges of dough balls. Bake for approximately 25 minutes, or until golden brown.

Makes 8 servings

Saturday, December 17, 2022

Kimmy's Kreations: Cornbread and Chicken Dressing


I have had this dish multiple times over the years at comfort and soul food restaurants all over the south.  I knew that it probably wasn't that hard to make, but probably a bit more complicated than just slapping some chicken in a box mix of cornbread dressing (although this is probably a quick way to the finish line).  More and more I'm trying to get layers of flavor into my cooking, and using a seasoned cornbread as the basis for this recipe gets everything off to a good start.  I will admit to backing off on the seasonings ever so slightly, but really, season with your heart.  Taste along the way.  You'll know when it's right.

Note: I used a cast-iron skillet to cook my cornbread, as should you all.  I used a big lasagne pan for the casserole dish - this makes A LOT.  You can also use turkey instead, especially if you have a lot left over from the holidays.

Cornbread and Chicken Dressing
Adapted from Kimmy's Kreations

3 tablespoons unsalted butter
1 small green bell pepper, chopped
1 small sweet onion, chopped
3 stalks celery, chopped
6 cloves garlic, minced
4 teaspoons poultry seasoning
4 teaspoons granulated onion
4 teaspoons granulated garlic
2 tablespoons Badia Complete seasoning
1 tablespoon kosher salt  
1 (10½-ounce) can cream of chicken soup
1 (10½-ounce) can cream of celery soup
3 to 4 cups chicken broth
1 pan Seasoned Cornbread (below), crumbled
Meat from one rotisserie chicken, shredded
Kosher salt and freshly ground black pepper, to taste
3 large eggs

In a large skillet over medium-high heat, melt butter, then add bell pepper, onion, and celery, and sauté until soft. Add garlic and cook for another 30 seconds or so.  Sprinkle with the seasonings and add the two cans of condensed soup. Add the chicken broth and mix well.

In a large bowl, combine the crumbled cornbread, the shredded chicken, and the soup mixture together. Add additional chicken stock if needed, and taste to see if additional seasonings are needed. Once thick, add the eggs and mix well. The mixture should be thick but jiggly. Pour into a casserole dish and cook at 375°F for 45 minutes.

Makes 8 to 10 servings  

Seasoned Cornbread

1¼ cup yellow cornmeal
1¼ cup all-purpose flour
2 tablespoons granulated sugar
1 tablespoon baking powder
½ tablespoon poultry seasoning
½ tablespoon garlic powder
½ tablespoon onion powder
½ cup (1 stick) unsalted butter, melted
½ cup vegetable oil
1 cup buttermilk
2 large eggs
Melted butter, for pan

Preheat oven to 400°F.

In a large bowl, combine all dry ingredients and whisk to ensure all spices are evenly distributed. Add liquid ingredients and mix well. Grease a 9-inch round cake pan with melted butter, and pour in the batter.  Bake for 18 to 20 minutes, or until a toothpick entered into the center comes out clean.

Tuesday, December 13, 2022

Reddit: Brown Butter Espresso Brownies


Sometimes you're just really craving a good brownie.  And sometimes you're just cruising Reddit, and your wish is granted.  I came across this luscious beauty and knew immediately that this was going to happen in my kitchen.  Each step of the process adds more and more flavor, until these are bursting with goodness.  And definitely don't skip the Maldon salt sprinkle at the end - this adds the something super special to the whole thing.

Note: I used Valrhona cocoa powder in my version, as I feel like it gives a really deep chocolate flavor.  If a 9x13-inch pan is too many brownies (is this even possible??), you can make a half recipe and use an 8x8-inch square pan.  If you can't find the espresso chips, you can of course use regular.

Brown Butter Espresso Brownies
From u/christophwelty on Reddit

1 cup (2 sticks) unsalted butter
1 cup granulated sugar
1 cup packed light brown sugar
4 large eggs
1 teaspoon espresso powder
½ teaspoon kosher salt
1 teaspoon vanilla bean paste
1 cup all-purpose flour
1 cup Dutch process cocoa powder, sifted to remove lumps
1 cup espresso chocolate chips
Maldon sea salt, to finish

Grease a 9x13-inch baking pan. Preheat the oven to 350°F.

In a large saucepan over medium-high heat, melt the butter and then proceed to cook it, stirring occasionally, until it browns and smells nutty. Remove from the heat and let set to cool slightly.

Add the sugars to the browned butter and mix well. Beat in each egg, one at a time. Mix in the espresso powder, salt, and vanilla paste. Stir in the flour and cocoa, taking care to mix just until combined completely.

Pour the batter into the prepared pan and sprinkle with the espresso chips. Bake for 23 minutes. Remove from the oven and sprinkle the top with the Maldon sea salt.

Friday, December 09, 2022

Jubilee: Catfish Étoufée and Pappadeaux Copycat Dirty Rice


When I got the Jubilee cookbook on a whim, I was not expecting to immediately identify a recipe I wanted to make.  Especially one that I wanted to make pretty much immediately.  But when I saw this catfish étoufée, it was love at first sight.  The recipe is really not hard to make (I was scared to make roux!), and it's absolutely delicious.  This will definitely be a repeat.  I served it with some dirty rice that I cooked up from an old recipe I got from the corners of the internet many many years ago.  Who knows where it originally came from, but it was also pretty good.

Note: I have doctored the dirty rice recipe to bring it more in line with what I remember the actual Pappadeaux version being like.  1) Less cayenne, since the restaurant version isn't that spicy, 2) more salt, since this one was a little bland, and 3) I think more pork next time instead of the gizzards it originally called for, since there's nothing chewy like that in the restaurant version.

Catfish Étoufée
From Jubilee by Toni Tipton-Martin

1 pound catfish fillets, or any other firm-fleshed white fish, cut into 4-inch pieces
1 teaspoon cayenne pepper
½ teaspoon kosher salt, or to taste
½ teaspoon freshly ground black pepper
¼ teaspoon dried thyme
½ cup vegetable oil
6 tablespoons all-purpose flour
¼ cup minced onion
2 tablespoons minced green bell pepper
2 tablespoons minced celery
1 teaspoon minced garlic
1 small bay leaf
1½ cups fish stock, warmed
1 tablespoon tomato paste
½ cup (1 stick) unsalted butter
2 tablespoons minced green onion
1 tablespoon chopped fresh Italian flat-leaf parsley
Freshly cooked rice

Place the catfish pieces on a plate and dry with a paper towel to help the seasonings adhere to the fish. In a small bowl, combine the cayenne, salt, black pepper, and thyme. Season the fillets with half of the seasoning.

In a large skillet, heat the oil over high heat until sizzling and nearly smoking. Reduce the heat to medium-high. Gradually whisk in the flour until smooth, being careful not to splatter any of the hot roux on your skin. Cook, stirring constantly, until the roux is medium-brown, about 5 minutes. Remove from the heat and stir in the onion, bell pepper, celery, garlic, bay leaf, and the remaining seasoning mixture. Return to the heat and cook, stirring constantly, until the vegetables are softened, about 2 minutes. Gradually stir in ½ cup of the warm fish stock and the tomato paste and stir until the sauce begins to thicken, about 1 minute, then remove from the heat.

In a separate skillet, heat 4 tablespoons of the butter until sizzling. Add the catfish and green onions and cook until the catfish is opaque (it does not need to brown), 2 to 3 minutes per side.

Transfer the fish, the remaining 4 tablespoons butter, and the remaining 1 cup stock to the skillet with the vegetables and cook for 2 to 3 minutes, shaking or stirring the pan constantly to melt the butter and emulsify it into a rich sauce. Remove and discard the bay leaf. Sprinkle the étoufée with the parsley and serve over rice.

Makes 4 servings

Pappadeaux Copycat Dirty Rice

⅓ pound ground chicken livers
 pound ground pork
1 tablespoon vegetable oil
2 tablespoons Dirty Rice Seasoning (below)
1 bay leaf
½ cup onion, diced
½ cup finely chopped green bell pepper  
1 tablespoon finely minced garlic
2 cups uncooked long grain rice
4 cups chicken stock
2 cups steamed long grain rice

Brown the ground meat mixture in the oil. Stir in the seasoning mixture and the bay leaf, and sauté about one minute. Add the vegetables and sauté 3 to 4 minutes over high heat, stirring frequently. Add the uncooked rice and chicken stock and mix in well. Cover and simmer over low heat for about 10 minutes. Stir in the steamed rice.

Dirty Rice Seasoning

2 teaspoons kosher salt
1 teaspoon cayenne pepper
1½ teaspoons freshly ground black pepper
1¼ teaspoons sweet paprika
1 teaspoon dry mustard (such as Coleman's)
1 teaspoon ground cumin
½ teaspoon dried thyme leaves
½ teaspoon dried oregano leaves

Thursday, December 08, 2022

A License to Grill: Smoked Beef Back Ribs


Holy heck.  I have to admit, I never thought something this beautiful and tender and succulent would come from anywhere but my local barbecue restaurant.  This new toy of mine is definitely earning its keep.  These babies cooked along all afternoon, mostly unheeded by me, and they turned out fantastically.  Get yourself a Traeger, folks.  Worth every penny.

Note: I used a beautiful rack of wagyu beef ribs I grabbed at Costco and The Salt Lick rub, because that's what I had, and their smoked meats are delicious.  Use what makes you happy.  I chose not to use the spray, as I read elsewhere that it basically destroys the crust and makes it take a lot longer to cook.  Every time you open the smoker, you disturb the internal temperature - "if you're lookin', it's not cookin'" appears to be the mantra.  My ribs took somewhere between 7 and 8 hours to finish; I stopped checking time and just checked temperature, so that's an estimate.

Smoked Beef Back Ribs
Adapted from A License to Grill blog

1 rack beef ribs
Rub of your choice

Preheat the smoker to 250°F.

Turn the ribs over so the bony side is up and peel off the membrane. This is the thick tissue that covers the back of the ribs. Use a butter knife to get under the membrane and loosen it. Once you get it lifted, use a paper towel to hold onto it and pull it off. Sometimes it pulls right off in one piece.
 
Generously coat both sides and all edges of the ribs with the rub. Let the ribs sit for 10 to 20 minutes to let the rub settle into the meat. You could also let the ribs sit in the fridge overnight with the rub – it will act as a dry brine and tenderize the meat further.
 
Place the ribs in the pre-heated smoker and cook for somewhere between 4 to 8 hours, until the ribs are 160°F on a meat thermometer.  Remove the ribs from the smoker and wrap in butcher paper.  Return the ribs to the smoker.

Continue smoking until the ribs register between 200°F and 205°F on the meat thermometer.  Remove the ribs from the smoker and cover with butcher paper or aluminum foil for 10 to 20 minutes before serving.

Wednesday, December 07, 2022

Jam Hands: Creamy Carrot Cornflake Casserole


I figured if there was going to be a lot more meat in life now that I have a smoker, I should probably start working more vegetables into the mix.  I randomly came across this recipe on Pinterest, and I was intrigued.  Carrots in cream sauce?  It sounds slightly odd to me for some reason, but it actually works out pretty well.  And I'm always a sucker for buttered cornflake topping.

Note:  This recipe was a mess.  The original called for ½ cup of flour, which meant that I was basically dealing with a blob of glue until I added another two cups of half-and-half.  I've fixed the ratio in the recipe below, so hopefully this doesn't happen to anyone else.  Otherwise, it's pretty yummy.  Also, not enough cornflakes for the amount of butter; also fixed.

Creamy Carrot Cornflake Casserole
Adapted from Jam Hands blog

½ cup (1 stick) unsalted butter, divided use
4 green onions, sliced
¼ cup all-purpose flour
1 teaspoon kosher salt
½ teaspoon freshly ground black pepper
½ cup heavy cream
1½ cups half-and-half
2 cups shredded sharp Cheddar cheese
2 pounds frozen crinkle-cut carrots, cooked according to the package directions and drained
1 tablespoon dried parsley flakes
4 cups cornflakes, crushed

Grease a 9x13-inch baking dish and preheat the oven to 350°F.

In a saucepan over medium-high heat, melt 4 tablespoons of the butter.  Add the onion and sauté for approximately 2 minutes.  Sprinkle the flour over the butter, then the seasonings.  Whisk in cream and half-and-half slowly until there are no lumps remaining.  Lower the heat and continue to cook until the sauce thickens.  Add the cheese; stir until smooth. Stir in the prepared carrots and parsley.

Spread the carrots in the prepared baking dish and cover with foil.  Bake for 40 minutes.

While casserole is cooking, melt 4 tablespoons of the butter.  Combine the crushed cornflakes and the melted butter; set aside.

Remove casserole from the oven, sprinkle with the cornflake mixture and return to the oven for another 5 to 7 minutes for the cornflakes to crisp and start to brown.  Serve hot.

Makes 8 to 12 servings

Tuesday, December 06, 2022

Showstopping BBQ with Your Traeger Grill: Smoked Bacon-Wrapped Stuffed Jalapeños


Well, I got a new toy, and that means that I need to start putting it through its paces.  I've never been a grill or smoker girl, and I think this is a bit of a lapse in my culinary experience, so I think it's time to take care of that deficiency.  But I didn't want to start out with a brisket, so I opted for these little parcels of fun.  And they are so delicious.  Not super spicy, but definitely flavorful.  No smoker?  Just make them in the oven, broiling a bit at the end to get the bacon to crisp.

Smoked Bacon-Wrapped Stuffed Jalapeños
Adapted from Showstopping BBQ with Your Traeger Grill by Ed Randolph

10 large jalapeños, 3 to 4 inches long
1 (8-ounce) package cream cheese, softened
½ cup finely shredded Cheddar cheese
¾ teaspoon granulated garlic
¾ teaspoon granulated onion
½ teaspoon smoked paprika
½ teaspoon garlic pepper
¼ teaspoon kosher salt
⅛ teaspoon Accent powder (optional)
10 slices thinly-sliced bacon
Meat Church Honey Hog BBQ rub

Prepare your smoker by bringing it up to 275°F.

Slice the jalapeños in half vertically, preserving as much of the stem as possible. Using a gloved finger, small spoon, or jalapeño corer, scoop out all the ribs and seeds and discard them.

In a bowl, mix the cream cheese, shredded cheese, and spices together until well combined. Slice the bacon in half longways, to make 20 long strips.

Spoon the cheese mixture into the jalapeños, then wrap each with a piece of bacon. Sprinkle evenly with the rub.  Place the jalapeños on a sheet tray and put the tray in the smoker for 30 minutes.

Increase the temperature of the smoker to 375°F and smoke for another 30 minutes to crisp the bacon.

Makes 20 jalapeños