Sunday, October 30, 2022

No. 2 Pencil: Make-Ahead Mashed Potatoes


I've never been one to make mashed potatoes ahead of time - I never have great luck that they are anything other than pasty and dried out when reheated.  But when you know you need to bring some mashed potatoes to a get together after work, you figure something out.  This recipe actually makes a really good reheated mashed potato.  I was honestly pretty shocked how good they were.  This is definitely a game changer for me.  Also, I almost forgot to take a picture as I was stuffing my face, so not a great beauty shot this time.

Make-Ahead Mashed Potatoes
Adapted from No. 2 Pencil blog

5 pounds russet potatoes, peeled and cut into chunks
12 tablespoons (1½ sticks) unsalted butter
2 teaspoons kosher salt
½ teaspoon ground white pepper
1 (8-ounce) package cream cheese, softened
1 cup half-and-half, warmed
Chives, for serving (optional)

Place potatoes in a large pot and fill with water. Bring potatoes to a boil, then reduce heat and let simmer for 15 to 20 minutes. Once potatoes are tender, drain really well in a colander. Rice potatoes into the same pot.

Cube one stick of butter and add to hot potatoes. Sprinkle in salt and pepper, and mix well. Add softened cream cheese and mix until combined. Stir in half-and-half. Transfer potatoes to a 13x9-inch glass baking dish. Slice remaining 4 tablespoons butter into six slices and lay on top of mashed potatoes.

Cover with foil and bake at 350°F for 35 to 45 minutes until heated through. For a golden brown top, leave potatoes uncovered. Sprinkle with finely diced chives, if desired.

Makes 10 servings

Sunday, October 23, 2022

Sip and Feast: Pasta alla Norcina and Serious Eats: Salsiccia di Norcia (Norcia Sausage)


I really can't stop myself from purchasing a small black truffle whenever I see them for sale.  I never know what I'm actually going to use them for (and honestly, I can default to just making the most fabulous scrambled eggs ever), but I can't stop myself.  This time I actually had a plan.  I'm a big lover of creamy pastas, and when I saw this one is traditionally topped with grated truffle, I knew I had to make it.  Definitely rich and filling, but oh so good.

Note: I used trecce pasta because it looked cool and was still tubular in form.  The sausage was super easy to make, but I think this would taste just as good with regular Italian sausage if you don't want to deal with the extra steps.

Pasta alla Norcina
Adapted from Sip and Feast blog

Salsiccia di Norcia (recipe below)
¼ cup olive oil
8 ounces cremini mushrooms, diced
1 small onion, diced
3 cloves garlic, minced
½ cup dry white wine
1½ cups heavy cream
1 pound rigatoni or other tubular pasta
1 to 2 cups reserved pasta water
Pinch freshly grated nutmeg
¾ cup grated Pecorino Romano
Kosher salt and freshly ground black pepper, to taste
Finely grated black truffle, for serving (optional)

Bring a large pot of salted water to boil.

Heat a large pan over medium heat, then add in the olive oil and sausage mixture. Brown the sausage, about 5 to 7 minutes, then make some room in the pan and add the mushrooms and continue to cook until they brown as well.

Once the sausage and mushrooms are brown, add the onion and garlic. Continue cooking for a few more minutes until the onions are soft. Turn heat to medium-high and add the wine. Cook for a minute to reduce the wine by about half. Scrape the bottom of the pan with a wooden spoon to remove all the brown bits. At this time begin cooking the pasta to a bit less than al dente.

Add the cream and bring sauce to a simmer while stirring. Once simmering, turn the heat down to low.

Once pasta is almost al dente, add it to the sauce and mix to coat. Turn heat to medium. Add a bit of pasta water if needed to loosen things up. Continue to cook, stirring frequently, until the pasta is perfectly al dente.

Turn the heat off and remove the pan from the heat. Add the Pecorino, mix well, then taste test. Season with a good amount of black pepper, a pinch of nutmeg, and salt to taste. Serve with grated Pecorino and grated black truffle.

Makes 6 servings

Salsiccia di Norcia (Norcia Sausage)

16 ounces ground pork, chilled
2 medium garlic cloves, minced
2 teaspoons kosher salt
1 teaspoon freshly ground black pepper
Pinch freshly grated nutmeg
2 tablespoons plus 2 teaspoons dry white wine, chilled

In a medium bowl, combine pork, garlic, salt, pepper, and nutmeg and stir with a wooden spoon to evenly distribute seasoning. Add chilled wine and stir vigorously with wooden spoon, working meat mixture against bottom and sides of bowl, until wine is incorporated and mixture becomes tacky and sticky, 1 to 2 minutes. Cover and refrigerate for at least 1 hour and up to 2 days.

Alternatively, combine pork, garlic, salt, pepper, and nutmeg in bowl of a stand mixer fitted with the paddle attachment. Mix on low speed until seasonings are evenly incorporated, about 1 minute. Add wine, increase speed to medium, and mix until wine is incorporated and mixture becomes tacky and sticky, 1 to 2 minutes. Cover and refrigerate for at least 1 hour and up to 2 days.

Saturday, October 22, 2022

The Dining Car: Chicken Croquettes


When I lived in New Jersey, I went on a pretty regular basis to a diner in my neighborhood.  This definitely isn't a thing in Texas, so I was fascinated.  This was also the first time I had a chicken croquette.  Oddly shaped like little cones, they're basically fried chicken dumplings.  Absolutely fantastic with mashed potatoes and gravy for a comfort meal.  It takes a while to get these all together, but they're definitely worth it.

Note: I, like basically everyone, love fried foods, but I do not love trying to clean up the used oil afterwards.  I opted to try the air fryer method, and it worked perfectly.  Even if it's not particularly healthier, it's definitely easier.  Also, when grinding the chicken, do not grind it into a paste.  You want a little bit of chicken chunks.  I hit the button on my food processor for about 5 or so seconds, and I think I got a good consistency.

Chicken Croquettes
Adapted from The Dining Car restaurant, Philadelphia, PA, as seen at Food Network

Croquettes:
1 cup whole milk
1 cup chicken stock
¼ teaspoon ground white pepper
¼ teaspoon poultry seasoning
2 teaspoons chopped fresh flat-leaf parsley leaves
Salt, to taste
½ cup (1 stick) unsalted butter
1 stalk celery, minced
½ small onion, minced
1 cup all-purpose flour
1¼ pounds cooked chicken meat (meat from one rotisserie chicken), ground in food processor 

Breading:
2 cups whole milk
2 large eggs
⅛ teaspoon kosher salt
3 cups all-purpose flour
3 cups fine breadcrumbs

In a heavy pot, heat the milk and chicken stock on the stove and then add the white pepper, fresh parsley, and salt, if needed. In a separate heavy pot, melt the butter and add the minced celery and onion.  Cook until tender, approximately 7 minutes. Stir in the flour and cook for 3 minutes, stirring frequently to keep the dough from burning. Pour in the hot milk mixture and stir until thickened and smooth. Fold in the chicken meat and allow to cool.

Shape 3-ounce portions of croquette batter in the shape of a cone and place on a tray lined with waxed paper. Next make an egg wash from the milk, eggs, and salt. Dip the croquettes in the egg wash and then into the flour and let stand a few minutes. Finish breading by dipping the croquettes back in the egg wash and then rolling in breadcrumbs.

Fry the croquettes in a pot with salad oil or liquid shortening, heated to 350°F, until golden brown, 2 to 3 minutes. Drain well and blot on paper towels. Place on a bed of mashed potatoes and top each croquette with chicken gravy.

Alternatively, spray each croquette with oil and cook in an air fryer set to 350°F for 12 to 15 minutes, until golden brown and hot.

Makes 15 croquettes

Tuesday, October 18, 2022

Yotam Ottolenghi: Miso Butter Onions


I saw this dish on Pinterest and very quickly realized it came out of a cookbook I had not yet used, so it gave me an excuse to try it out.  It's very simple, with only four ingredients, but they really do meld together into something greater than the sum of the parts.  This is a wonderful option for a meatless meal, as it still has all of the umami notes that a meat dish would have.

Note: My oven only went to 475°F on the bake setting, and it worked just fine, just took a little longer to cook than listed below.  Also, I'm not sure where he's getting these tiny onions or giant shallots, but I was only able to find five small-ish white onions that totaled the called for weight, and that seemed to work fine.  This also probably impacted my cook time.

Miso Butter Onions
From Flavor by Yotam Ottolenghi

8 small onions or 8 large shallots, about 5¼ ounces each, for a total of 2⅔ pounds
7 tablespoons unsalted butter, melted
⅓ cup plus 1 tablespoon white or other miso paste
4 cups warm water

Preheat the oven to 500°F.

Halve the onions or shallots lengthwise, discarding the papery skin, as well as the layer beneath if it is tough or dry. Trim the tops and a little off the bottom (not too much - you want to ensure the onion halves stay held together at the base).

In a medium bowl, whisk together the melted butter, miso, and warm water until fully combined.

Place the onion halves, cut-side down and spaced apart, in a 9x13-inch high-sided baking dish or pan and pour in the miso water. Cover tightly with aluminum foil and bake for 35 minutes, then remove the foil and turn the onions over so they are cut-side up (take care to ensure they remain intact). Baste the onions very well, then return to the oven, uncovered, for another 45 to 50 minutes, basting every 10 minutes, until the onions are very soft, deeply browned on top, and the sauce has reduced to a gravy consistency.

Carefully transfer the onions to a platter, pouring the sauce over and around them, and serve at once.

Makes 6 servings

Sunday, October 02, 2022

Serving Dumplings: Thai Coconut Salmon Curry


I think I'm living proof that cruising around on Pinterest is dangerous business.  I come across some fantastically delicious looking recipes, and I just can't help myself but make them.  Luckily I had most of the ingredients for this one already, in addition to the usual salmon craving I'm nursing.  So it was a no brainer.  Spicy, had to be balanced a bit in the flavorings, but the salmon was delicious, and the rice definitely helped.  I'll probably play with this recipe some more.

Note: I used a package of salmon chunks since that's what I found at the grocery store.

Thai Coconut Salmon Curry

4 salmon fillets, skin removed
Kosher salt
Ground white pepper
Sweet paprika
2 tablespoons coconut or vegetable oil
1 tablespoon unsalted butter
1 small onion, finely chopped
4 garlic cloves, minced
1 tablespoon grated ginger
1 red bell pepper, finely chopped
2 tablespoons tomato paste
3 tablespoons Thai red curry paste, such as Maesri
½ teaspoon ground coriander
½ teaspoon ground cumin
1 teaspoon red pepper flakes, optional
½ cup vegetable broth
1 baby bok choy, roughly chopped, or 2 ounces baby spinach
1 tablespoon fish sauce
1 tablespoon peanut butter
1 (13½-ounce) can unsweetened coconut milk
1 to 2 tablespoons lemon or lime juice
1 tablespoon granulated sugar or honey, optional
Thai basil leaves
Steamed Jasmine rice

Pat the salmon fillets dry with a paper towel and season all over with salt, white pepper, and sweet paprika.

Heat coconut oil and butter in a large non-stick frying pan over medium high heat. Add the salmon fillets and sear, about 3 to 4 minutes on each side. Remove from the pan and set aside.

In the same pan, add onion, garlic and ginger. Cook for 2 minutes over low heat until fragrant. Add bell pepper, cook for 3 minutes, stirring occasionally. Stir in tomato paste and curry paste, cook for 1 minute. Add coriander, cumin and red pepper flakes. Season with salt and pepper. Pour in broth and bring to a boil.

Add bok choy, fish sauce, and peanut butter. Stir to combine. Pour coconut milk and bring to a simmer.
Nestle salmon in the sauce. Sprinkle with lemon juice and simmer for 3 to 5 more minutes or until the salmon is just cooked through and the sauce is slightly thickened. Test the balance of flavors and add sugar or honey, if needed.  Remove from heat.

Stir in the basil leaves and serve with rice.

Makes 4 servings

Saturday, October 01, 2022

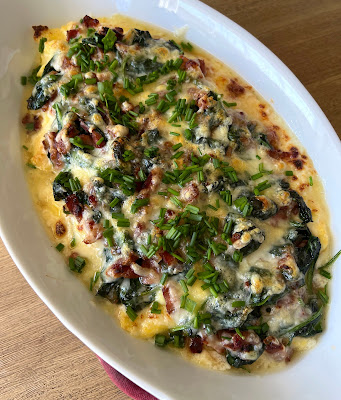
Food and Wine: Scrambled Eggs Florentine


With a little flock of chickens now running around my yard acting like idiots, I find myself positively drowning in eggs.  I thought I regularly used quite a lot, but apparently not enough to keep up with my prolific little hens.  I also found myself with a bit of leftover mascarpone cheese, and there's no reason to let that go to waste.  So I located this fantastic recipe and ran with it.  Perfect with some bread for a late breakfast.

Note: I added the bacon and shallot to the recipe below, and I think it worked fantastically.  If you're trying to be lacto-ovo vegetarian, you can of course leave the bacon out.

Scrambled Eggs Florentine
Adapted from Food and Wine magazine

3 slices applewood smoked bacon, diced
1 medium shallot, finely chopped
¼ cup unsalted butter, divided use
4 ounces fresh spinach, chopped
1½ teaspoons kosher salt, divided use
6 large eggs, beaten
¾ cup mascarpone cheese
3 ounces Fontina cheese, shredded (about ¾ cup), divided use
1 tablespoon snipped fresh chives
Ground white pepper
1 loaf crusty Italian- or French-style bread, sliced and toasted

In a large nonstick skillet over medium heat, cook bacon until fat has rendered and meat parts are crisp.  Add the shallot and cook until translucent.  Add 2 tablespoons butter, then add the spinach and 1 teaspoon salt, and cook, turning with tongs, until wilted, about 3 minutes. Transfer spinach mixture to a plate.

Melt remaining 2 tablespoons butter in skillet. Add eggs, sprinkle with remaining ½ teaspoon salt, and swirl to coat skillet evenly. When edges are cooked, drag cooked egg to edges of pan using a heatproof rubber spatula to form large, soft curds. Cook until eggs are nearly set, about 4 minutes. Remove from heat. Gently fold mascarpone and ½ cup Fontina into eggs until cheeses are melted.

Preheat broiler. Place egg mixture in a shallow 8-inch square baking dish. Sprinkle wilted spinach mixture and remaining ¼ cup Fontina on top. Broil until cheese is melted and bubbly, about 5 minutes. Garnish with chives and black pepper, and serve immediately with toast slices.

Makes 8 servings