Pages

Tuesday, February 28, 2023

Donna Hay: Maple and Thyme Roasted Pumpkin


Ever since acquainting myself with the kabocha pumpkin many years ago, I've been a big fan.  While I know the butternut squash is the true star of the pumpkin puree can, I was drawn to kabocha as more of a "pumpkin", while still being delicious to eat.  So I regularly collect any recipes I can that make this pretty squash shine, especially as the season ends.  This recipe was incredibly easy, and the nuts were a fantastic foil for the squash, even if my convection oven got a little overzealous.

Note: The original recipe used pecans and almonds, but I had some walnuts left over, so I used those instead of the almonds.  Honestly, use whatever nuts make you happy - they all work.

Maple and Thyme Roasted Pumpkin
Adapted from Donna Hay magazine, issue 38, as seen at 80 Breakfasts blog

4 wedges golden nugget pumpkin or kabocha squash, about 1½ pounds total weight
Scant ¼ cup maple syrup
5 tablespoons unsalted butter, melted
½ teaspoon dried thyme leaves
½ cup chopped walnuts
½ cup chopped pecans
Kosher salt and freshly cracked black pepper

Preheat oven to 375°F.

Place the maple syrup, butter, thyme, and nuts in a bowl and stir to combine. Season with salt and pepper to taste – it should have a sweet-salty flavor balance.

Arrange squash wedges in a roasting pan, or any sort of pan where they’d fit. Pour the honey-nut mixture over the squash, dividing evenly between their little hollows. Roast for 30 to 40 minutes or until tender.

Makes 4 servings

Sunday, February 26, 2023

The English Kitchen: Sticky Sausages


There's just something comforting and homey about a nice sausage with mash.  And I'm not even British.  And there's a part of me that secretly loves a good marmalade, so when I find a recipe to use it in unusual ways, I'm always interested.  These bangers were delicious, the sauce was a perfect foil for the fattiness of the sausage.  I will admit that I made some parsnip puree instead of a good British mash, but it was still delicious.  Definitely on the rotation list.

Note: I managed to find Irish bangers, and that's what I used for this recipe, because I definitely didn't want some fennel-choked Italian link.  It's actually a bit surprising how hard it is to find British sausages in the US.  Italian and German, yes.  British?  Not a chance.

Sticky Sausages
Adapted from The English Kitchen blog

1 tablespoon canola oil
4 pork sausages, such as Cumberland
2 tablespoons balsamic vinegar
2 tablespoons orange marmalade
2 tablespoons soy sauce
1 teaspoon Dijon mustard
1 sprig fresh rosemary

Heat the oil in a skillet and add the sausages. Cook the sausages, turning them frequently, until golden brown on all sides and almost cooked through (about 12 minutes). Drain any remaining oil from the pan.

Whisk together the vinegar, marmalade, soy sauce, and mustard in a small bowl. Warm together in the microwave until the marmalade melts, whisking all together well. Pour this over the sausages in the skillet and add the rosemary. Simmer gently for several minutes, until sausages are well-glazed and cooked through.

Makes 4 servings

Saturday, February 25, 2023

Serious Eats: Creamed Shishito Peppers


When I came across this recipe, I was intrigued - I had only ever sautéed whole shishito peppers as a sort of appetizer.  But as a big fan of "creaming" every vegetable known to man, I was definitely on board with giving this the 'ol college try.  It definitely doesn't end up with the silken texture you get from creamed spinach or kale, and it's chock full of the seeds, but the random hot pepper gives it a nice warmth, and I can definitely see this being a nice side for a well-cooked ribeye.

Creamed Shishito Peppers
From Serious Eats

1 tablespoon extra-virgin olive oil
8 ounces shishito peppers, stemmed and thinly sliced into rounds (yielding about 3 cups)
2 medium shallots, thinly sliced
2 garlic cloves, thinly sliced
Kosher salt and freshly ground black pepper
1 cup heavy cream
1 ounce grated Parmigiano-Reggiano
Pinch freshly ground or grated nutmeg

In a 10-inch skillet or 3-quart saucier, heat oil over medium heat until shimmering. Add shishito peppers, shallots, and garlic, season with salt and pepper, and cook, stirring frequently with a rubber spatula, until vegetables are softened but not browned and shishito peppers are still bright green, 5 to 7 minutes.

Add heavy cream, season lightly with salt, and bring to a rapid simmer. Continue to cook, adjusting heat as necessary to maintain a rapid simmer, stirring frequently to keep vegetables from sticking and cream from scorching on the sides of the pan, until cream is reduced to a saucy consistency, 5 to 7 minutes.

Remove from heat, add grated cheese and nutmeg, and season with salt and pepper to taste. Serve right away, or cool and refrigerate in an airtight container for future use.

Makes 4 servings

Friday, February 24, 2023

Yossy Arefi: Chocolate Peanut Butter Cake


Okay, I couldn't help myself.  After the other little cake, I needed to try another one.  And this recipe, with it's chocolate peanut butter cup attitude was calling my name.  I've never actually put the peanut butter IN the cake, but it absolutely works.  And this was so fast to slap together.  It's probably bad for me to have this book - it's encouraging frequent cake making.

Note: As you can probably tell from the picture, I did not make a glaze.  I made a frosting.  I just used less liquid.  Because I wanted frosting, dang it.  Also, I used half-and-half instead of water in the "glaze".  Because why use water when you can use dairy products?  I also used cocoa nibs on top because I didn't have peanuts.  And I also threw about ½ cup of chocolate chips in the cake batter before baking because I'm over the top like that.

Chocolate Peanut Butter Cake
From Snacking Cakes by Yossy Arefi

1 cup packed light brown sugar
2 large eggs
½ cup smooth peanut butter
½ cup canola oil
½ cup whole milk
1 teaspoon vanilla extract
¾ teaspoon kosher salt
½ cup unsweetened Dutch process cocoa powder
1 cup all-purpose flour
1 teaspoon baking powder
½ teaspoon baking soda
½ cup hot coffee or water

For the glaze:
1 cup powdered sugar
2 tablespoons smooth peanut butter
1 teaspoon vanilla extract
Pinch of kosher salt
1 to 2 tablespoons hot water
½ cup chopped roasted and salted peanuts
Flaky salt, to finish (optional)

Position a rack in the center of the oven and preheat the oven to 350°F. Butter or coat an 8-inch square pan with nonstick spray. Line the pan with a strip of parchment paper that hangs over two of the edges.

In a large bowl, whisk the brown sugar and eggs until pale and foamy, about 1 minute. Add the peanut butter, oil, milk, vanilla, and salt. Whisk until smooth and emulsified. Add the cocoa powder and whisk until smooth.

Add the flour, baking powder, and baking soda and whisk until well-combined and smooth.  Lastly, add the coffee and stir until well-combined and smooth.

Pour the batter into the prepared pan, tap the pan gently on the counter to release any air bubbles, and smooth the top of the batter with an offset spatula.

Bake the cake until puffed and a tester inserted into the center comes out clean, 45 to 55 minutes. Set the pan on a rack to cool for about 15 minutes. Then use the parchment paper to lift the cake out of the pan and set it on the rack to cool completely.

To make the glaze:
In a bowl, whisk the powdered sugar, peanut butter, vanilla, kosher salt, and 1 tablespoon hot water until smooth.  If the glaze is very thick, add more water, a few drops at a time, until it is a smooth and pourable consistency.

Pour the glaze over the cooled cake and sprinkle with chopped peanuts and a few sprinkles of flaky salt (if using).  Let the glaze set for about 20 minutes before slicing the cake.

Sunday, February 19, 2023

Bon Appétit: Radicchio Salad with Sour Cream Ranch


If you've spent any time reading the recipes on this blog, you'll know that I will randomly grab ingredients that look delicious or interesting or rare or just plain bizarre, and I'll get them home, and then I have to figure out what to do with them.  This is definitely one of those cases.  And the instigator this time is Castelfranco radicchio.  It is so cute!  With its red spots!  And tiny head!  Yes, I'm a sucker, but this was a delicious salad with not many ingredients.  The breadcrumbs are especially yummy.

Note: I added the cherry tomatoes, since they were also cute, and I'm not mad about it.

Radicchio Salad with Sour Cream Ranch
Adapted from Bon Appétit, November 2018 issue

⅓ cup sour cream
⅓ cup plain whole-milk Greek yogurt
1 tablespoon plus 1½ teaspoons sherry vinegar or apple cider vinegar
5 garlic cloves, 1 finely grated, 4 crushed
1 teaspoon honey
2 to 3 tablespoons snipped chives  
8 tablespoons extra-virgin olive oil, divided
Kosher salt
2 scallions, thinly sliced
½ cup panko
Zest from ½ lemon
2 medium radicchio, preferably Castelfranco, leaves separated

Mix sour cream, yogurt, vinegar, grated garlic, honey, chives, and 5 tablespoons oil in a small bowl; season dressing with salt.

Heat remaining 3 tablespoons oil in a medium skillet over medium. Add crushed garlic and scallions and cook, stirring often, until golden brown around the edges, about 4 minutes. Add panko and season with salt. Cook, stirring often, until golden brown, about 3 minutes. Finely grate lemon zest directly into pan and toss a few times to incorporate. Transfer breadcrumbs to paper towels to drain; let cool. Taste and season with more salt if needed.

Place radicchio in a large bowl. Drizzle with dressing; toss gently to coat. Season with salt and scatter breadcrumbs over.

Makes 8 servings

Saturday, February 18, 2023

Yossy Arefi: Chocolate-Almond Olive Oil Cake with Raspberries


So, I got a new cookbook.  And it's full of these delicious little cakes that fit in one 8-inch square pan.  So of course I can't resist, because this is just the size of cake I need for me to enjoy thoroughly while also not feeling guilty about wasting food when I inevitably have to trash the part I didn't get to. (When I was a kid, I could never even conceive of the idea of trashing cake.  Horrors.)  This one appealed to me since it used half almond flour, and I have to say I'm a fan.

Note: The book also mentions that you can make this cake in a 9-inch round pan or a 9x5-inch loaf pan if you don't want to use the 8-inch square.

Chocolate-Almond Olive Oil Cake with Raspberries
From Snacking Cakes by Yossy Arefi

1 cup granulated sugar
2 large eggs
1 cup plain whole milk yogurt
⅔ cup olive oil
1 teaspoon pure vanilla extract
¾ teaspoon kosher salt
¾ cup unsweetened Dutch process cocoa powder
¾ cup all-purpose flour
½ cup almond flour
1 teaspoon baking powder
½ teaspoon baking soda
1 cup fresh raspberries
1 tablespoon cocoa nibs

Position a rack in the center of the oven and preheat the oven to 350°F. Butter or coat an 8-inch square pan with nonstick spray. Line the pan with a strip of parchment paper that hangs over two of the edges.

In a large bowl, whisk the sugar and eggs until pale and foamy, about 1 minute. Add the yogurt, oil, vanilla, and salt. Whisk until smooth and emulsified. Add the cocoa powder and whisk until well-combined and smooth.

Add the all-purpose flour, almond flour, baking powder, and baking soda and whisk until well-combined and smooth.

Pour the batter into the prepared pan, tap the pan gently on the counter to release any air bubbles, and smooth the top of the batter with an offset spatula. Scatter the raspberries and cocoa nibs over the top.

Bake the cake until puffed and a tester inserted into the center comes out clean, 40 to 50 minutes. Set the pan on a rack to cool for about 15 minutes. Then use the parchment paper to lift the cake out of the pan and set it on the rack to cool completely.

Tuesday, February 14, 2023

Veg Recipes of India: Kadai Paneer


I have been a big fan of Veg Recipes of India for a couple of years now, and that's inevitably where I go when I need a new recipe.  This blog taught me to be a better cook when it comes to Indian food, and I'm forever grateful.  I'm not even scared to grab that block of paneer at the store, because I know I'll find something delicious to make with it.  This is what?  The fourth paneer recipe on here?  All fantastic.

Note: I did not have whole kashmiri chilies, so I opted for the ground powder that I did have.  Also used ground coriander because I was lazy.  You should absolutely use what the original recipe suggests and don't be lazy like me if you have the time.

Kadai Paneer
Adapted from Veg Recipes of India blog

1 (1½-inch) piece ginger, peeled
8 garlic cloves
4 tablespoons ghee
2 medium onions, chopped
3 teaspoons ground coriander
2½ teaspoons kashmiri chili powder
2 plum tomatoes, finely chopped
5 plum tomatoes, pureed
1 small green pepper, cut into bite-size squares
1 small red pepper, cut into bite-size squares
¾ cup water
2½ teaspoons kosher salt
1½ teaspoons crushed kasuri methi (dried fenugreek leaves)
1 teaspoon garam masala
8 to 10 ounces paneer, cubed
2 tablespoons half-and-half
1 to 2 tablespoons cilantro, chopped

Crush the ginger and garlic to a fine paste in a mortar and pestle or small food processor.

In a pan heat the ghee. Then add the ginger-garlic paste and sauté until the raw aroma disappears. Then add the chopped onions and sauté until transparent. Add the ground coriander and kashmiri red chilli powder. Mix well.

Add the finely chopped tomatoes and sauté until the tomatoes become pulpy and you see oil releasing from the sides of the tomato masala. Then add tomato puree. Stir well and continue to sauté until you once again see oil leaving the sides, about 9 to 10 minutes on low.

Add the green and red bell pepper. Stir and simmer for 2 to 3 minutes on medium-low. Add the water and salt and continue to simmer for 7 to 8 minutes, until the bell pepper is al dente. Then add kasuri methi and garam masala and stir.

Add paneer cubes and stir gently. Cook the paneer in the sauce for about 2 minutes. Just before serving, gently stir in half-and-half. Garnish with chopped coriander leaves and serve with rotis, naan, steamed rice or jeera rice.

Makes 4 servings

Monday, February 13, 2023

Life Made Simple: Cheesy Broccoli Stuffed Baked Potatoes


When trying to come up with something super easy to make for a weeknight meal, that also happens to be sort of vaguely nutritious, I came up with the idea to make stuffed potatoes.  And to make them healthy, they definitely needed broccoli.  But not too healthy, so they also needed cheese sauce.  These are comforting when it's cold out and filling and tasty.

Note: While I did have Cheddar cheese in my fridge, I also had a nice block of smoked Gouda that I hadn't found a use for, so I opted for that in my sauce.  Still delicious.

Cheesy Broccoli Stuffed Baked Potatoes

4 large russet potatoes
2 teaspoons vegetable oil
2 teaspoons kosher salt, divided use
1 pound broccoli florets
2 tablespoons olive oil
¼ cup (½ stick) unsalted butter
¼ cup all-purpose flour
2 cups whole milk
½ teaspoon ground white pepper
½ teaspoon garlic powder
¼ teaspoon onion powder
¼ teaspoon smoked paprika
2 cups grated Cheddar cheese (or smoked Gouda)

Preheat oven to 425°F.

Place scrubbed, dried potatoes on the baking sheet. Rub each with oil, sprinkle with 1 teaspoon kosher salt, and prick with a fork three times on each top. Wrap each potato in foil and place all four on a baking sheet. Bake for 40 minutes.

While potatoes are baking, making a foil boat/tray and place broccoli on it. Drizzle with olive oil and season with salt and pepper.  Put the foil boat on the tray with the potatoes and return to the oven to bake for an additional 20 minutes. Once the time is up, check potatoes and broccoli for doneness.  Smaller potatoes may be ready and should be set aside, still wrapped to remain hot.  Larger potatoes and broccoli may take a little longer. Remove from the oven and set aside when broccoli is tender and potatoes are soft.

Meanwhile, in a small saucepan set over medium heat, add the butter. When the butter has melted, whisk in the flour, cook for 1 minute. Slowly add milk, whisking to create a smooth sauce. Bring mixture to a low simmer.

Add remaining 1 teaspoon salt, white pepper, garlic powder, onion powder, and paprika. Simmer until thickened, about 5 minutes. Remove from heat and stir in cheese, stirring until melted, then broccoli.

Remove potatoes from foil, cut lengthwise, and press the ends of the potatoes to open.  Fluff the insides, adding some butter if desired.  Spoon broccoli cheese sauce over potatoes. Serve immediately.

Makes 4 servings

Sunday, February 12, 2023

Nerdvana: Diamond Butt Stallion (Lemon Meringue Pie Cocktail)


I was lucky enough to get to visit a fun little place called Nerdvana with a friend.  This is a restaurant/bar, but not just any restaurant/bar.  This one has video game systems at every table, so you can pick your poison and play through dinner.  I definitely didn't expect much of the food and drinks, but they were shockingly good.  The highlight of the night was this beautiful lemon cocktail, which I have desperately tried to replicate here.  If I'm able to return and spy on the bartender, I will definitely continue to tinker, but this should get you most of the way there.

Diamond Butt Stallion (Lemon Meringue Pie Cocktail)
Unabashedly borrowed from Nerdvana, Frisco, TX

Rainbow sugar sprinkles
1 ounce Pinnacle cake-flavored vodka
3 ounces limoncello
¾ ounce lemon juice
2 tablespoons lemon curd

Dip the rim of a martini glass or coupe glass in water, then in the rainbow sugar.  Add all remaining ingredients to a cocktail shaker with some ice and shake about 5 times, then pour the strained liquid into the prepared glass.

Makes one fabulous cocktail

Maangchi's Real Korean Cooking: Hobakjeon (Korean-Style Zucchini Pancakes) and Jat-jang (Creamy Pine Nut Sauce)


I finally found some organic zucchini squash that didn't look like it was 24 hours from rotting!  It's the small victories, guys.  Well, I wanted to make something that brought the zucchini front and center, and I'd had my eye on this recipe for a while, so I decided it was time.  But the real star of this show is the dipping sauce, which I made on a whim.  It was surprisingly delicious with these fried zucchini slices.  I highly recommend.

Hobakjeon (Korean-Style Zucchini Pancakes)
From Maangchi's Real Korean Cooking

1 medium zucchini (about 8 ounces), sliced into ⅛-inch disks
Kosher salt
¼ cup all-purpose flour
2 large eggs
About 3 tablespoons vegetable oil
Jat-jang (Creamy Pine Nut Sauce) (below)

Arrange the zucchini slices in a single layer on a cutting board and sprinkle evenly with ½ teaspoon kosher salt. Let stand for 5 to 7 minutes. They will sweat out some of their liquid and become a little soft.

Gently blot the zucchini dry with paper towels. Transfer to a bowl. Add the flour and toss well to coat.

Beat the eggs in a small bowl with a pinch of salt.

Heat a large skillet over medium-high heat for 2 minutes. Turn the heat down to medium. Add 1 tablespoon of the vegetable oil and swirl to coat the bottom of the pan. Working in batches, one by one, dip each of the flour-coated zucchini slices in the eggs and place in the pan; do not crowd. Cook, turning the slices once or twice, until they are light golden brown and crisp, 3 to 5 minutes; add more oil to the pan as needed. Transfer to a plate. Serve with the sauce.

Makes 4 servings

Jat-jang (Creamy Pine Nut Sauce)
From Maangchi's Real Korean Cooking

¼ cup pine nuts, preferably Korean
1 garlic clove, chopped
½ teaspoon kosher salt
1 tablespoon honey or granulated sugar
1 tablespoon distilled white vinegar
1 tablespoon water

Combine all the ingredients in a food processor or blender and process until creamy, scraping down the sides of the bowl as necessary, about 1 minute. Scrape into a small bowl and serve, or cover and refrigerate for up to 2 days.

Makes about ⅓ cup

Saturday, February 11, 2023

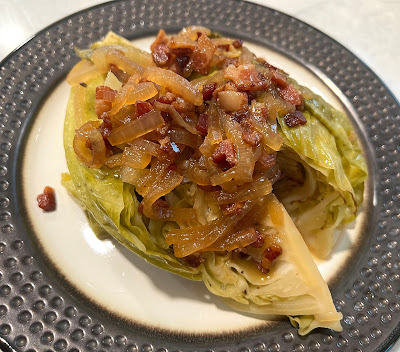
Tom Colicchio: Apple Cider-Braised Cabbage


I've been eating a lot of cabbage.  I mean, I'm not complaining, I've got some good recipes, but at the tail end of winter, there's not much else in the produce section.  I wanted to try something new and interesting, and I thought this might just fit the bill.  It creates and interesting mish mash of sweet and sour and savory that is definitely interesting, but I'm not sure I'm absolutely sold.  Or it might be that my cabbage with bacon and cream is just that good.

Apple Cider-Braised Cabbage
From Tom Colicchio, as seen at Food and Wine

2 tablespoons extra-virgin olive oil
One (1½-pound) head of green cabbage, cut through the core into 6 wedges
½ cup chopped bacon (about 2 ounces)
1 medium onion, halved through the core and thinly sliced lengthwise
Kosher salt
½ cup apple cider vinegar
2 cups apple cider
1 tablespoon unsalted butter
Freshly ground black pepper

In a large, deep skillet, heat the olive oil until shimmering. Add the cabbage wedges cut side down and cook over moderate heat, turning once, until browned, 6 to 8 minutes total. Transfer to a plate.

Add the bacon to the skillet and cook over moderate heat, stirring occasionally, until rendered but not crisp, about 5 minutes. Add the onion and a generous pinch of salt and cook, stirring occasionally, until softened and just starting to brown, about 10 minutes. Stir in the vinegar and simmer over moderately high heat until reduced by half, about 3 minutes. Add the cider and bring to a boil. Nestle the cabbage wedges in the skillet, cover and braise over moderately low heat, turning once, until tender, about 20 minutes. Using a slotted spoon or spatula, transfer the cabbage to a platter and tent with foil.

Boil the sauce over moderately high heat, stirring occasionally, until slightly thickened, about 5 minutes. Remove the skillet from the heat and swirl in the butter. Season the sauce with salt and pepper; spoon over the braised cabbage and serve.

Makes 6 servings

Friday, February 10, 2023

Giada de Laurentiis: Limoncello


So, I technically made this a couple of weeks ago, but bottled it this evening.  I had run across some Santa Teresa lemons at my local store's "citrus fest", and after a short google search, realized they were the lemons used in limoncello.  Well, that was almost like a dare to me.  So I trucked home a whole bag and set to work delicately peeling every single one, carefully removing any whiff of pith.  Luckily the rest is just patience, and this recipe delivers.  This is my new apéritif before dinner.

Limoncello
From Giada de Laurentiis, as seen at Food Network

10 lemons, Santa Teresa variety if available
1 (750mL) bottle vodka
3½ cups water
2½ cups granulated sugar

Using a vegetable peeler, remove the peel from the lemons in long strips (reserve the lemons for another use). Using a small sharp knife, trim away the white pith from the lemon peels; discard the pith. Place the lemon peels in a 2-quart pitcher. Pour the vodka over the peels and cover with plastic wrap. Steep the lemon peels in the vodka for 4 days at room temperature.

Stir the water and sugar in a large saucepan over medium heat until the sugar dissolves, about 5 minutes. Cool completely. Pour the sugar syrup over the vodka mixture. Cover and let stand at room temperature overnight. Strain the limoncello through a mesh strainer. Discard the peels. Transfer the limoncello to bottles. Seal the bottles and refrigerate until cold, at least 4 hours and up to 1 month.

Makes 7 cups

Saturday, February 04, 2023

Sam the Cooking Guy: Garlic Bread French Bread Pizza


If you know me pretty well, you'll know I'm not really a pizza person.  I went probably a decade after high school without eating a slice.  I like to blame it on all the pizza I ate when I was a kid, but I think it's more the fact that I can only eat a small portion before I'm stuffed.  And the toppings are the best part.  Well, this pizza turns that philosophy on its head: the best part of this one is the bread.  First you turn a bread loaf into garlic cheese bread, then you turn that into pizza.  And yes, it's as fantastic as it sounds.

Garlic Bread French Bread Pizza
Adapted from Sam the Cooking Guy

½ cup (1 stick) unsalted butter, softened
8 cloves garlic, minced
½ cup grated Parmesan
½ cup chopped Italian parsley
½ teaspoon roasted garlic powder
1 teaspoon dried Italian seasoning  
1 tablespoon olive oil
Salt and pepper, to taste
1 loaf French bread
Pizza sauce
Mozzarella cheese, both shredded and pearls
Toppings

Preheat the oven to 425°F.

Combine butter, garlic, Parmesan, parsley, seasonings, and olive oil to form a paste. Season with salt and pepper.

Cut the French bread loaf in half, separating the top and bottom. Spread the seasoned butter on the cut side of both pieces. Place the bread on a rack set on a baking sheet. Bake for 6 to 7 minutes.

Remove the tray from the oven. Top the garlic bread with pizza sauce, cheese, and other toppings, as desired. Put the tray back in the oven for 8 to 10 more minutes, or until the cheese is melted and the toppings are cooked.

Makes 4 servings

Wednesday, February 01, 2023

Serious Eats: Ganach Lupia (Armenian Braised Green Beans)


I don't know what it was about this recipe, but as soon as I saw it, I wanted to make it.  Maybe it was something to do with the lamb.  Or the slow cooked green beans in tomato sauce.  Whatever it was, it fit right into my decision to make something that didn't take much hands on time.  And I was well rewarded - the green beans are tender, the lamb melts in your mouth.

Note: I used mild biber salçasi pepper paste that I found on Amazon, but honestly, I'd probably go with hot next time.  Also, I did not cut every single green in half lengthwise.  With two pounds to clean, it would have taken me half of forever.  It still turned out delicious.

Ganach Lupia (Armenian Braised Green Beans)
From Serious Eats

2 pounds bone-in lamb shoulder chops, 1 to 1½ inches thick
2 teaspoons Diamond Crystal kosher salt
½ teaspoon black pepper
1 (14½-ounce) can whole peeled plum tomatoes
2 tablespoons extra-virgin olive oil, divided
1 small yellow onion (about 7 ounces), finely chopped
¼ teaspoon baking soda
4 garlic cloves, minced
4 anchovy fillets
2 tablespoons mild or hot biber salçasi pepper paste
1 tablespoon tomato paste
1 teaspoon ground allspice
1½ cups water
2 pounds green beans, trimmed and halved lengthwise
2 tablespoons chopped fresh parsley
1 cup Greek yogurt
Rice pilaf, for serving

Preheat oven with rack set in middle position to 325°F. While oven heats, using a sharp knife, remove bones from chops, leaving meat in large chunks and leaving behind any segments of meat clinging to bones. Cut boneless pieces into 1-inch chunks and trim of excess fat. Place meat and bones in a bowl and toss with salt and pepper. Let stand at room temperature for at least 40 minutes and up to 2 hours. Meanwhile, place tomatoes and their juices in a second bowl, crush coarsely with a pastry cutter or chop with a pair of kitchen shears, and set aside.

Heat 1 tablespoon oil in a Dutch oven over medium heat until shimmering. Add boneless lamb pieces and cook, turning occasionally, until lamb is well browned on 2 sides, about 10 minutes. Return lamb to bowl with bones and set aside.

Add onion and baking soda to Dutch oven and cook, stirring frequently, until softened but not browned, 5 to 7 minutes. Add garlic and anchovies and cook, stirring and breaking up anchovies occasionally with a wooden spoon or rubber spatula, until anchovies have dissolved, about 4 minutes. Add pepper paste, tomato paste, and allspice, stir to combine with allium-anchovy mixture, and continue to cook until mixture turns dark brick red, 2 to 4 minutes longer.

Add lamb, lamb bones, water, and tomatoes to Dutch oven and stir to combine. Cover, and transfer to oven. Bake for 45 minutes, stirring occasionally.

Stir in green beans, cover, and return to oven. Cook until meat is very tender, 1½ to 2 hours.

Stirring gently to avoid crushing beans, add 1 tablespoon parsley and season with additional salt to taste. Transfer to serving bowl, top with remaining parsley, and serve, with yogurt and rice pilaf on side.

Makes 6 to 8 servings